Hi there, ladies and gentlemen! My name is Aaron Moss, and welcome to the first edition of Quick Bites. The goal of these blog posts are to provide red and blue teams with some quick how-to tips and tricks from the mind of a hacker. (OOOOHHHHH!! Scary! Right? No? Good! We're Professionally Evil, not scary. Unless Kevin is dressed up as Chewbacca. THAT might be a little scary...I mean, he’s gotta be OVER 8 FEET TALL - ahem. I digress.)
Anyway - today I wanted to share some Quick Bites (trademark pending) about finding open Windows (and Samba) shares on your network, and then how to lock them down. Now, you may be wondering why I’m writing on a topic that seems so blasé, and I’ll tell you - unknown and forgotten about file shares are one of the ways that have been instrumental for Professionally Evil people (like yours truly!), and of course, criminals, to escalate access or steal data from corporations for years. I think a lot of admins would be really surprised to find out how many open shares actually exist on their network, versus what they *think* exist on their network. I know that many of the admins I’ve helped over the years have been surprised about the sheer number of shares I’ve located, and I’ve not been able to give extensive lists, because networks can be so large and complicated.
And now, I’m going to show you a couple of cool tools to add to your arsenal to find open shares. Then we’ll go over how to lock those shares down according to one of my personal favorite principles - The Principle of Least Privilege.
Now, what is the Principle of Least Privilege? Uh, exactly what it sounds like. Giving users access to ONLY the resources they need to do their job and no more than that. And locking down network shares is just one of the many steps towards doing that, but it’s an important step and the reason for this post.
But first…
Ok, first things first - we’re scanning the network with a normal Domain User account. We can also use these tools with no credentials at all to see if there are any unauthenticated shares open, which would be bad. So if you want to try that first, then the same rules and tips apply, just without a username and password. Most of the tools will still work without the creds.
Also, one of these tools may require at least a little familiarity with Linux (preferably Kali, cause the tools are installed there already, and I’m an Offensive Security Certified Shill Expert). If you’re not familiar with Linux, then familiarity with Python on Windows will be a must for the last one…
Ok! Ready to get started? No? Well, put down that PB&J, and let’s go!
Tool 1: Softperfect Network Scanner (Windows - Freemium)
Alright, so the first tool out of the gate is the Softperfect Network Scanner (SNS). Long before I was hacking networks, I was building and maintaining them. Like many other sysadmins, I had my own arsenal of tools that I carried on a flash drive wherever I went. Quite a few of the tools I had stored up from my Helpdesk days, and they just happened to work really well for system administration. SNS was one of those tools that served me well for years, and little did I know it would continue to serve me well long after I was no longer a sysadmin.
My primary reason for using SNS initially was to scan my networks to see what systems had what DHCP IPs, but then graduated to also using it for Remote WMI, Remote Registry, and a few other options available. The nice thing is that it can handle hundreds of systems at once, and you can export the results to HTML, CSV, or JSON! Perfect for sysadmins of smaller networks, or small segmented networks. Of course, it can also show you all the open Windows SMB shares available on a system, which you can then open. For the Blue Team, it’s a wonderful tool that can show all kinds of information about your network! For the Red Team, it’s a WONDERFUL tool that can show all kinds of information about your client’s network!
How does it work? I thought you’d never ask! There’s no trick to it, it’s just a simple trick! (And points to you if you got that reference ;D) Simply put your IP address ranges you want to scan into SNS, and hit Start Scanning. That’s it. Seriously.
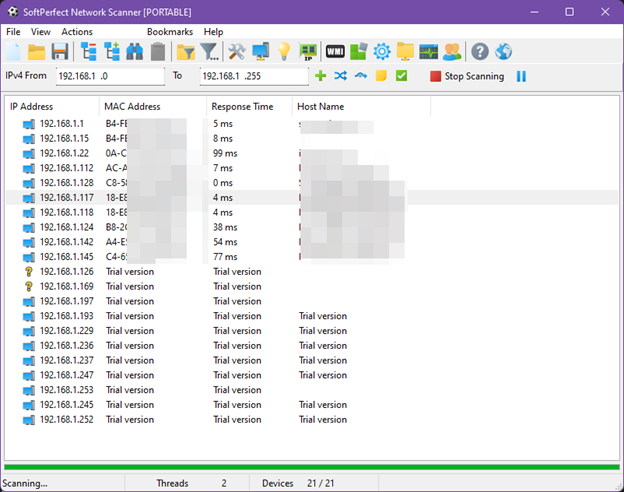
Apparently I have a lot more devices on my home network than I initially thought. Also, note the 10 device limitation.
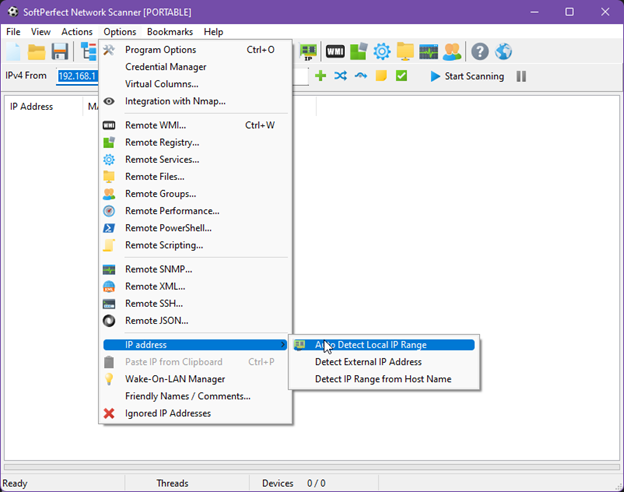
Here’s a nice way to find the local IP range if you don’t want to look it up. I’m lazy. :)
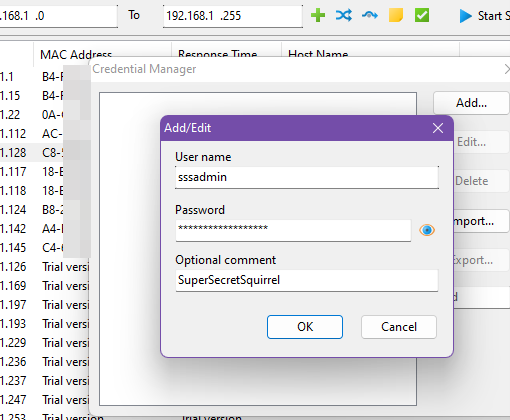
Where SNS really shines though, is in the Credential Manager - and this counts for both Red and Blue Team. Credential Manager allows you to put in the username and password for several different systems, and then choose which ones you want to use for scanning. So, as a Blue Teamer, if you want to find out what shares are open to a user with Domain Users permissions, simply plug in a user’s details, and scan your network. After that, you’ll have an idea of where all the different SMB shares exist on your network, so you can then start locking them down.
Red Team, once you have credentials, if you can get access to Remote Desktop on a server (or desktop, whatever) somehow, upload and run this tool to see what else is out there. And don’t forget to destroy the evidence BEFORE you’ve completed the assessment.
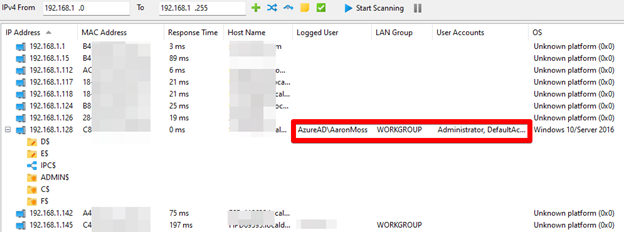
Added bonus! With the right credentials, you can also see what users are currently logged into a Windows system. (Hint, hint Red Team…)
Now, I will say that this tool isn’t free. SNS is a freemium software, meaning that the trial version is limited to 10 systems. But, one license is only $30, so it’s really not that expensive at all, ESPECIALLY for all the neat subtools (did I just invent a new word?) built into this one tool. For Blue Team, it’s really small and very powerful, and it doesn’t leave a large footprint.
One more added bonus for the Red Team! This tool doesn’t (usually) get caught by any EDRs or AVs because it’s a sysadmin tool, so it’s much sneakier to bypass some of those controls that other tools might not work so well with.
Softperfect Network Scanner can be found here - https://www.softperfect.com/products/networkscanner/
Tool 2: Advanced IP Scanner (Windows - Free)
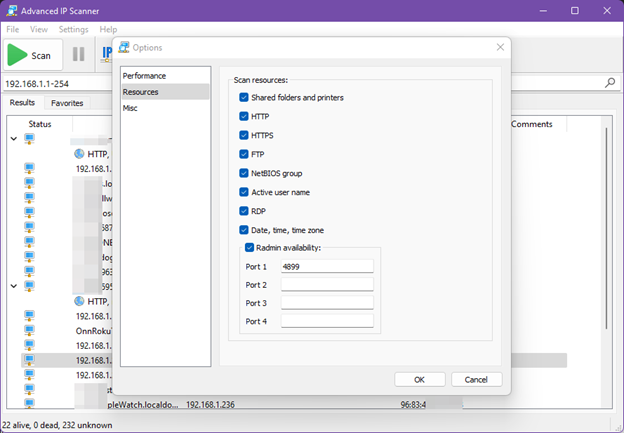
Advanced IP Scanner is another Windows tool, it’s free (!!), but it’s not as robust as Softperfect. Not a lot of bells and whistles on this one folks. It basically does exactly what the name suggests - it’s an Advanced IP Scanner. With that being said, there’s no limitations on the IPs scanned, and it can show you open file shares, HTTP/HTTPS ports, active users, and all the other stuff listed in the screenshot below.
Once again, it’s as simple as giving it the IP ranges you want to scan, and hitting Scan. This one was nice enough to fill in all the IP ranges I currently have on my laptop automagically, so it was almost literally plug and play (and I imagine it will do the same for you). Just like SNS above, once a service or file share is found to be open, just double-click to open it.
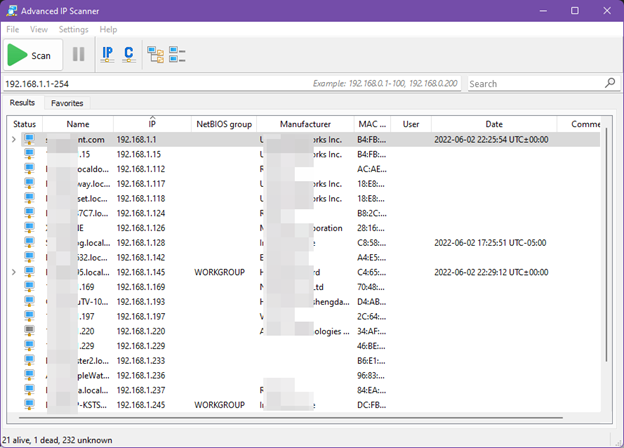
Very simple, very small, and also like SNS, can run in Portable mode. The only downside I see to this scanner is that it did not identify any of the hidden shares that were available on the systems that were scanned, and that’s something that an attacker will definitely be looking for on a Windows network. I know I certainly do.
If you’re looking for a quick, simple, and FREE scanner for Windows, Advanced IP Scanner is the one for you. Find it here - https://www.advanced-ip-scanner.com/
Tool 3: SMBMap (Linux/Windows - Free)
Oh man, where to begin with this one? This is a great tool for internal engagements for the Red Team. It was actually primarily built as an internal network pentesting engagement tool, enumerating SMB shares (including Windows and Samba shares, of course). I’ve used it for years now to find open shares on networks. It’s also really useful for finding out if a user that I’ve captured/cracked credentials for is a local administrator on some Windows systems…NICE functionality built in. With proper permissions, SMBMap can also read directories, upload/download files from SMB shares, and even perform command execution! It’s pretty cool.

Now, SMBMap is written in Python, so it’s cross-compatible with any system that can run Python - Windows/*nix, etc. It’s pre-installed on Kali, which, as we’ve already discussed, I’m kinda fond of, so that’s where I’ve used it primarily every time (with that being said, maybe I should try it on Windows sometime).
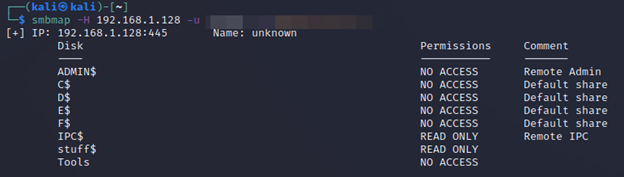
Anyway, its usage is a little different from both of the previous tools, as it’s purely command line (there’s no GUI), and nothing is done automagically for you. But that’s ok, because you know how to read manuals and documents in your sleep. You’re in IT after all, and that’s a part of the job! It’s actually pretty simple to use once you figure it out. You just need the username, password, and domain, and then either an IP address or a text file full of many IP addresses, and let it go to work. This is an example from a VM that I have setup for a lab. This is with a standard user, with permissions to limited shares.
And now, an administrator on that same system.
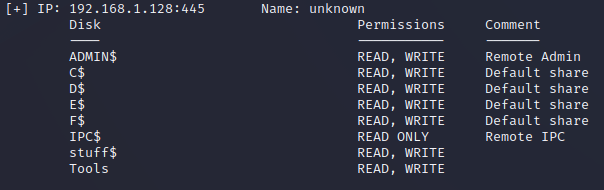
Pretty cool right? Shows you all the shares that are open, and what kind of access that particular user HAS on them. That alone is something that the other two tools can’t do, and one of the reasons that I like this tool over the others overall. It might be a little more complicated to use, but once you’re used to it, it’s an EXCELLENT way to scan your network and find those open shares, particularly before Professionally Evil cats like me can.
Locking Down The Shares
So, how do we lock down all these shares now that we know where they are? That’s actually the simple part. Go to the server (or workstation/desktop), and turn off sharing if it’s not needed. That’s the first part. If the share IS needed - that is, there’s a BUSINESS reason to have the share open and functioning - then it’s time to make sure that the share permissions are only allowed to the people who need access to the share.
Who needs access to the share? Well, that depends, doesn’t it? I’ll give you an example. Does someone in the Accounting Department need access to Human Resources shares? Probably not. Does someone in Human Resources need access to the IT Network Configurations share? Nope (and also, why is that out there in the first place? And yes, I have seen that recently in a pentest). So, go to the different shares, and check permissions on all of them. If the shares aren’t needed, kill them. As I said, SIMPLE. It just takes time.
The point is this: the Principle of Least Privilege states that a resource should not have access to other resources that it does not need access to to complete its job duties. Period.
That’s all folks!
Ok! That was it! Quick (hopefully), fun (hopefully) and painless (maybe?)!
Join me next time on Quick Bites when we’re going to be digging into the fundamentals of application security. Until next time!
Open shares are one of the first things we look for on a pentest.
Forgotten file shares, overprivileged access, and exposed credentials sitting in shared folders: we find them all the time. If you want to know what is open on your network before an attacker does, we can help.
Get in Touch