
In our previous blog post, we covered how to create an encrypted flash drive using LUKS (Linux Unified Key Setup) to provide data at rest security. However, it is possible to create an encrypted partition and file system on a file container that can be mounted thanks to the loop device system in Linux. This can be useful for a few different use cases. Using a file container, we could have formatted the flash drive for NTFS and just allocated a file container to store sensitive data encrypted while the rest of the drive is basically usable everywhere else without encryption.
Another great use case is for file storage of tool logs when using WSL on a machine during a penetration test. I've observed some EDRs will create alerts about the output of logs that some hacking tools generate. On that front, I've had success with storing the encrypted file container in the mounted Windows C:\ drive for extraction later, while having the tools write to the LUKS partition within WSL to hide those log files from the EDR.
Overall, the process for an encrypted file container is very similar to the encrypted flash drive. In this blog post, we will use a 16 GB flash drive, now formatted as a single NTFS partition, and allocate an 8 GB file container for our encrypted volume. This allows us to use 8 GB of the flash drive for LUKS encryption and the other half of the drive as a normal unencrypted flash drive. You could just create two partitions on a flash drive, but it is much easier to migrate the file container to a new drive since it's just a single file.
Step 1: Allocate a File Container with dd
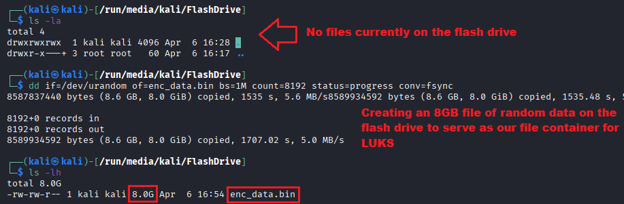
With our flash drive plugged in and mounted, we will first need to allocate the file we will use as our encrypted file container. We will be using 8 GBs for this and the easiest way to create this file will be to use the dd tool.
For the if parameter of the command, you can specify either /dev/zero or /dev/urandom. The /dev/zero device will create the file with null bytes (0x00) throughout the entire file where /dev/urandom will create the file with random bytes. Personally, I prefer to use the /dev/urandom device so the file container is already full of entropy from the start.
Since we want this file to be 8 GB, we will set the block size via the bs parameter to 1M, and provide the count of 8192, which adds up to 8 GB with a 1M block size. Finally, we will provide two additional parameters of status=progress and conv=fsync. The first one is to make it so dd will provide us with status information as it is creating the file and the second will force it to sync the writes before it is finished so that way the data is confirmed to have been written to the disk and isn't buffered. The final command we will use to create the file container is as follows:
dd if=/dev/urandom of=enc_data.bin bs=1M count=8192 status=progress conv=fsync
Step 2: Initialize the LUKS Partition on the File
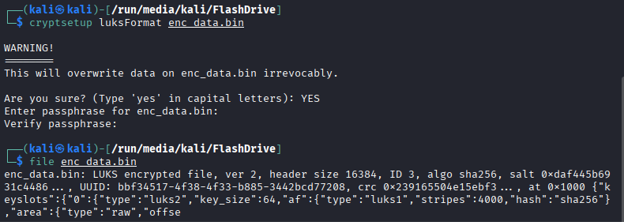
Now that we have the file container, we can just write a LUKS partition directly to it, skipping the fdisk stuff that was needed for the flash drive. We will initialize the partition for LUKS using the cryptsetup command with the luksFormat action. For this, we will use a command similar to encrypting the flash drive, but target the file container we created rather than a disk partition using the following command:
cryptsetup luksFormat enc_data.bin
The screenshot below shows this command being run to create the LUKS partition on the file container, followed by the file command to confirm the file is showing a LUKS v2 header on it.
Step 3: Open the LUKS Partition
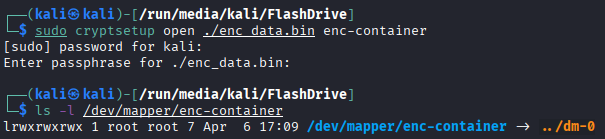
Now that we have created the LUKS partition, we need to open it just like we did for the encrypted flash drive. The process of opening it will prompt you to pass the passphrase and assign it to a mapper device name. The command we will use to open our LUKS partition in the file container is as follows:
sudo cryptsetup open ./enc_data.bin enc-container
Step 4: Create a Filesystem on the Encrypted Partition
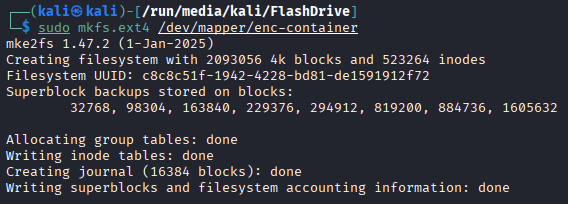
Now that we have opened the LUKS partition and it is available to us as /dev/mapper/enc-container, we must create a filesystem on it before we can use it. Just like with the flash drive example, we will use an ext4 filesystem using the following mkfs.ext4 command:
sudo mkfs.ext4 /dev/mapper/enc-container
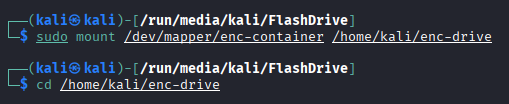
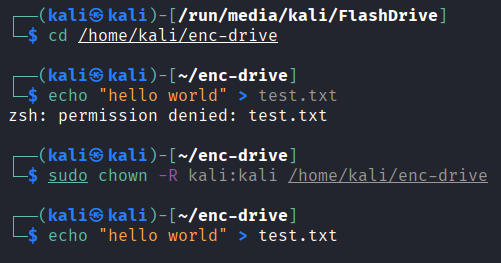
Step 5: Mount the Filesystem and Fix Ownership
With the filesystem created on it, we can now mount it to a folder using the mount command. For our example, we will use the following command:
sudo mount /dev/mapper/enc-container /home/kali/enc-drive
We can follow this up with a lsblk command and see the file was automatically mounted as loop0 using the loop device system and is mounted to the target mount point /home/kali/enc-drive.

However, just like with the flash drive example, we will need to correct the ownership of the filesystem using the chown command so our normal user can write to it. For that, we can use the following command:
sudo chown -R kali:kali /home/kali/enc-drive
The screenshot below shows an example where attempting to create a file failed until the ownership was corrected with the chown command.
Step 6: Unmount and Close the LUKS Partition
When you are finished using the drive, you will need to first unmount the file system, then close the LUKS partition. This can be done with the following command:
sudo umount /home/kali/enc-drive && sudo cryptsetup close /dev/mapper/enc-container
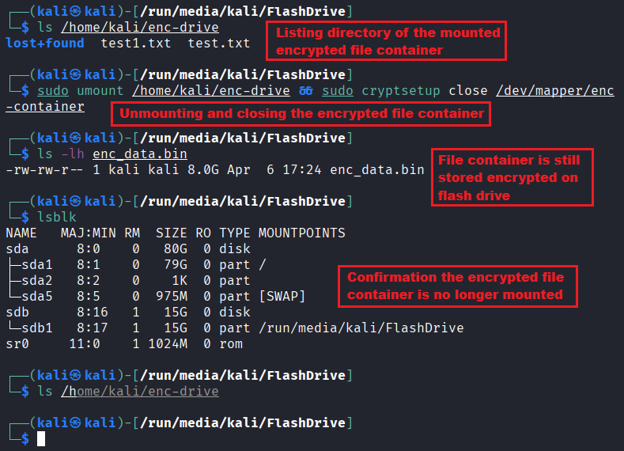
The NTFS flash drive is still mounted at this point, however the encrypted data in the file container is no longer exposed.
Conclusion
The encrypted file container approach can be useful for having a small container for encrypted data that can be mounted via LUKS. This is a great option as LUKS, once mounted, is transparent for you as a user, meaning you don't have to think about it. Just move the file there and encryption and decryption will happen automatically. Encrypted file containers can also be an excellent solution for compartmentalizing sensitive data. By only opening that data when it is needed and closing the LUKS partition immediately after, you reduce the chance of this data being accessed during a compromise.
Furthermore, the flash drive with the encrypted file container will still work on other systems with half of the NTFS partition still free. For example, the screenshot below shows the flash drive mounted on a Windows system where the encrypted file container can be seen.
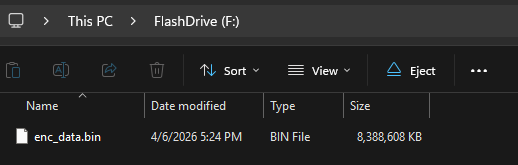
On these other systems, the data in the encrypted file container will not be accessible natively, but with some creativity it is possible. For example, Windows supports WSL, which can provide a Linux shell that would be able to mount this file. But again, this would require some setup to use and should not be expected to work out of the box.
In the next blog post, we will cover the basics of key management in LUKS, which would work on this encrypted file container or the flash drive to allow us to change the passphrase, set up multiple passphrases, and even set up key files to use in place of passphrases, which can make automation possible through the /etc/crypttab for mounting secondary disks without needing to enter a passphrase after boot.
Protecting data during an engagement matters.
Our pentesters handle sensitive client data every day. If you need a team that takes operational security as seriously as the test itself, let's talk.
Contact Us