
Portable devices that store information are both a wonderful convenience and a data security nightmare. Any device that is small and mobile has an increased risk of being lost or stolen, where the data on it would be in the hands of whoever recovers the device. The best defense against this threat is to utilize disk encryption to protect the data at rest on any device that is intended for mobility, such as flash drives, laptops, phones, etc. Today, we will focus on how LUKS (Linux Unified Key Setup) can be used to protect a flash drive for use with Linux-based systems. However, there are a few caveats to be aware of before we begin:
- LUKS will only work natively with Linux-based systems. LUKS is native to Linux, much like BitLocker is native to Windows, and GELI is native to BSD. This flash drive should not be expected to work cross-platform.
- This blog post assumes the flash drive is fresh and has no existing data. The steps that follow in this blog will cause you to lose any existing data on the flash drive. If this is a flash drive you've been using before this process, you will need to back up the data before encrypting the flash drive.
In this blog post, we will outline the steps of encryption for a flash drive through example. We will be using a small fresh 16 GB flash drive with a Kali Linux system to set up an encrypted flash drive with an ext4 filesystem.
Step 1: Plug In and Identify the Flash Drive's Device Name
The first thing we need to do is plug in the drive and identify the device name since we will need to pass that value into commands later. The easiest method to do that is with the following lsblk command:
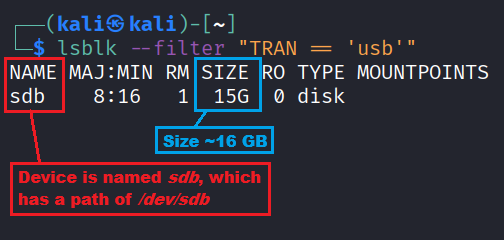
lsblk --filter "TRAN == 'usb'"
This should show you a list of USB drives connected to your system. The main value you need from this output is the value listed under the NAME column. The screenshot below shows an example of the output generated by the command that identifies our 16 GB flash drive as /dev/sdb.
Step 2: Create a Fresh Partition Using fdisk
Now that we know the name of our target device (/dev/sdb), we need to set up a partition table on the device. For this task, we will use fdisk to create a single partition on the flash drive. This is objectively the most complicated part of this setup, so headers are used below to break this process up to make it easier to follow.
Launching fdisk
Now that we know the flash drive is at /dev/sdb, we can use the fdisk utility to delete any existing partitions and create a fresh new single partition on this device. The fdisk utility can be run as a TUI utility against the flash drive using the following command:
sudo fdisk /dev/sdb
Once that command is executed, you should be shown the prompt displayed in the following screenshot.
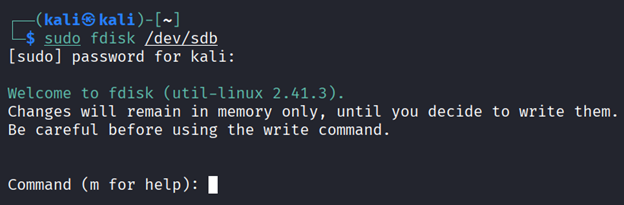
The fdisk utility takes commands as a single letter. It shows in the prompt that the letter m can be used to display a help screen if needed. However, for most people, you'll just need to know the following ones:
- Managing Partitions:
- P: Prints out the partition table
- D: Deletes a partition
- N: Add a new partition
- Exit Commands:
- W: Write the partition table to disk and exit
- Q: Quit without saving changes
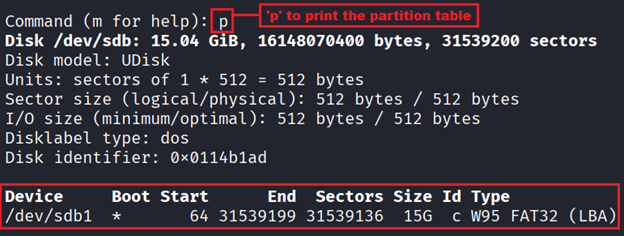
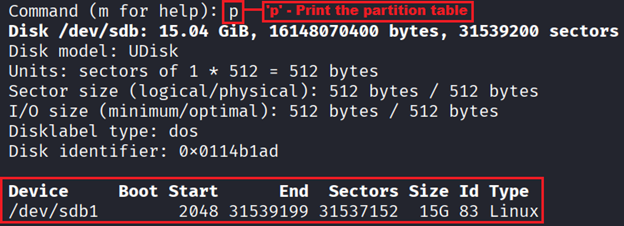
Reviewing the Existing Partition Table
Before performing any operations on the disk, you should check the existing partition table. This can be done using p to print the partition table. The flash drive already had a single partition on it from the factory, as shown in the screenshot below.
Deleting the Existing Partition
Since there was already a partition from the factory, we will delete the existing partition using the d command. This command will prompt you to select the target partition if there is more than one. However, in our case there is only one partition, so it will automatically delete it without further input from us.

Creating a New Partition
Now that the partition table is empty, we will create a new partition using the n command. This will prompt for a few things. It will ask if the partition is a primary or extended partition, and for the start offset and end sectors of the partition. If you intend to use the whole drive for this partition, you can just hit enter on these prompts as the default would be a primary partition and assume the starting and last sectors of the drive for the sectors inputs.

Reviewing the Partition Changes
Now that we have deleted the factory partition and created a new one, we will want to view the partition table and make sure it looks correct before we commit these changes. Once again, we use the p command to print out the table.
Writing the Partition Changes
After reviewing the new partition table, we now need to write those to the flash drive. Everything we've done to this point has been in-memory within fdisk. This allows you to make the edits and still abort if you want. It takes one additional command of w to write those changes to the disk, or the q command to abort the changes and leave the disk unmodified. Since we want to commit these changes, we will run the w command, which will write the new partition table and exit fdisk.

Finally, we can check if the OS sees the changes by using a simple ls command against the target device.
ls -l /dev/sdb*

With that output, our newly created partition is at the path /dev/sdb1.
Step 3: Initialize the LUKS Partition
Now that we have a fresh partition, we will initialize the partition for LUKS using the cryptsetup command. This command is used to manage LUKS volumes and has many actions that can be supplied to the command. A high-level list of the basic actions you'll want to know for getting started are listed below:
luksFormat: Initialize a LUKS partition and set the initial passphraseopen: Opens a LUKS partition and attaches it to a mapper deviceclose: Closes a LUKS partition
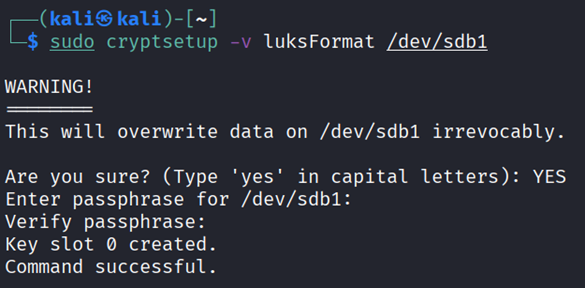
To initialize our LUKS partition on the flash drive and set our initial passphrase, we will use the following command:
sudo cryptsetup -v luksFormat /dev/sdb1
This command will provide some interactive prompts. The first one requires you to type yes in all caps to confirm that you understand that this will wipe the data on the partition. After that you will be asked to provide a passphrase for the encryption and to confirm it via double blind entry. A few things to note here:
- You should choose a strong passphrase for encryption. Since this is a last line of defense to protect your data when the device is lost or stolen, the passphrase should be resilient against brute force attacks.
- There is no password recovery system in LUKS. If you forget your passphrase, your only option would be to attempt a brute force attack to recover the passphrase, or the data is effectively lost. Consider logging the passphrase in a password manager.
Step 4: Open the LUKS Partition
Now that we created the LUKS partition, we will need to open it. The process of opening it will prompt you for the passphrase and assign it to a mapper device name. The basic syntax for the open action in cryptsetup is as follows:
sudo cryptsetup open [/dev/sdX#] [NameForMapperDevice]
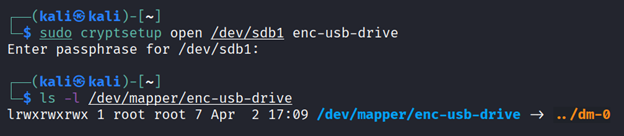
There are two parameters in that example syntax you'd need to provide with what you want them to be. The first parameter is [/dev/sdX#], which is the path to your LUKS partition. For our example, that would be /dev/sdb1. The second parameter is [NameForMapperDevice]. This can be anything you want it to be, so long as it is unique and not already in use under /dev/mapper/*. For our example, we will be using the value enc-usb-drive. The command we will use to open our LUKS partition on the flash drive is as follows:
sudo cryptsetup open /dev/sdb1 enc-usb-drive
Step 5: Create a Filesystem on the Encrypted Partition
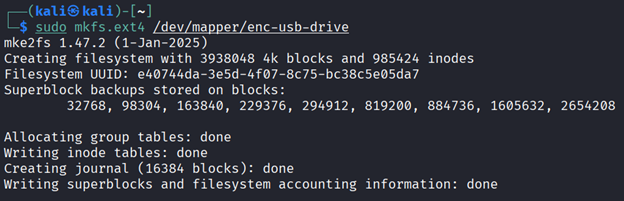
Now that we have opened the LUKS partition and it is now available to us as /dev/mapper/enc-usb-drive, we must create a filesystem on it before we can use it. There are several options for which one you want to use. However, we will use EXT4 for the filesystem since it's a mature standard on Linux systems and battle tested for reliability. For this, we will use the following mkfs.ext4 command:
sudo mkfs.ext4 /dev/mapper/enc-usb-drive
Step 6: Mount the Filesystem and Fix Ownership
With the filesystem created on it, we can now mount it to a folder using the mount command. For our example, we will use the following command:
sudo mount /dev/mapper/enc-usb-drive /home/kali/enc-drive
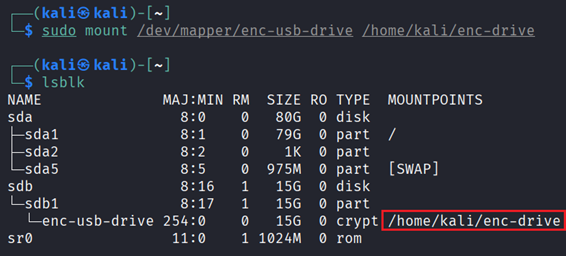
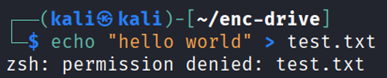
However, this was all created with the root user, and the owner of the filesystem will be root. If we switch into the mount point folder and try to create a test file as our normal user, we will get a permission error.
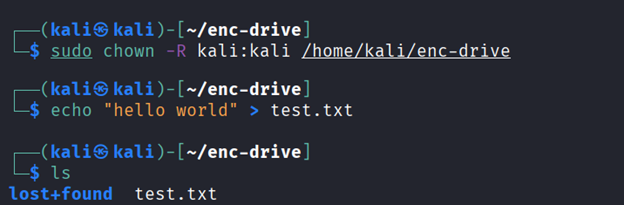
To fix this, we need to use the chown command to set the owner to our user. For that, we can use the following command:
sudo chown -R kali:kali /home/kali/enc-drive
Step 7: Unmount and Close the LUKS Partition
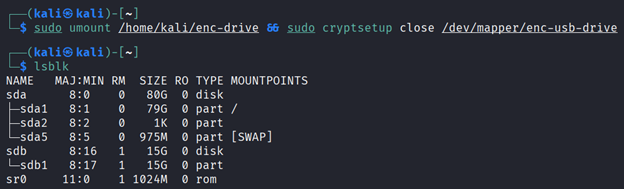
When you are finished using the drive, you will need to first unmount the filesystem, then close the LUKS partition. This can be done with the following command:
sudo umount /home/kali/enc-drive && sudo cryptsetup close /dev/mapper/enc-usb-drive
Conclusion
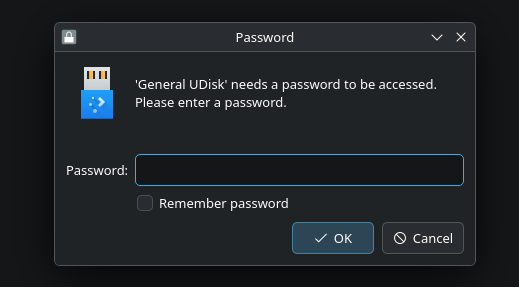
The initial setup for the encrypted flash drive might seem complex at first, but it gets easier over time. As for the usage, Kali by default ships with the XFCE desktop environment, which doesn't reduce any friction here. However, if you were using a desktop environment such as KDE, it would show you the drive to mount it with a single click, recognize it's LUKS encrypted, and prompt for a password, all through the UI.
Either way, this is the most basic way to add disk encryption to a flash drive in Linux. In a future blog post, we will cover using a file container for LUKS, which would allow us to have a flash drive that would work everywhere for general non-sensitive file transfer, but have an entire encrypted filesystem on a single file of the flash drive that could be mounted on a Linux system.
Concerned about data at rest across your organization?
From disk encryption to full infrastructure security assessments, our team can help you evaluate how well your data is protected. Reach out to discuss your needs.
Talk to Our Team
