
Overview
NMAP is a fantastic tool for performing initial reconnaissance and enumeration. A simple NMAP scan can reveal open ports on a system and moreover help identify what is running on those open ports and oftentimes even the version. This information makes determining the next steps easier. However, sometimes NMAP comes across something it doesn't know how to identify.
In this blog, we will set out to look at how version detection works, and how we as end-users of NMAP can create signatures so that NMAP can properly identify a service so next time our job is easier.
How Version Detection Works in Nmap
NMAP created the version and service detection engine to be hackable by its users. The engine itself is driven by a flat file nmap-service-probes. On most Linux systems, this file is found at /usr/share/nmap/nmap-service-probes. I will provide a high level overview of how this works here, however a more comprehensive read of the topic can be found in the NMAP book in Chapter 7: Service and Application Version Detection, which has an entire section dedicated to this file alone.
At its core, the nmap-service-probes file is a flat file consisting of probes and matches. The idea is that it will send out a probe to a service, and then check if any of the matches under that probe produce a hit. A probe can have multiple match searches under it and matches can make use of regular expressions. This is because a simple probe might be able to work on several services. An example here would be a simple GET / HTTP/1.0 probe. While this can detect web services, more granular matches might help detect the web application running on it. Another instance might be that a service can be configured to provide more or less information.
Another benefit of matches using regular expressions is that you can make use of capture groups to harvest information from the responses. This is useful since if a response reports a version or perhaps the OS or hostname in a response, you can capture that information and attach it to the NMAP scan, helping produce a more useful scan report.
General Layout of the nmap-service-probes File
The nmap-service-probes file has a one-to-many relationship between the probe and matches. Let's look over a probe and its matches to break it down:
##############################NEXT PROBE##############################
Probe TCP Radmin q|\x01\x00\x00\x00\x01\x00\x00\x00\x08\x08|
ports 4899,9001
rarity 8

match fcgiwrap m|^\x01\x0b\0\0\0\x08\0\0\0\0\0\0\0\0\0\0$| p/fcgiwrap/

match radmin m|^\x01\x00\x00\x00\x25\x09\x00\x01\x10\x08\x01\x00\x09\x08| p/Famatech Radmin/ v/2.X/ i/Windows Authentication/ o/Windows/ cpe:/a:famatech:radmin:2/ cpe:/o:microsoft:windows/a
match radmin m|^\x01\x00\x00\x00\x25\x0a\x00\x01\x10\x08\x01\x00\x0a\x08| p/Famatech Radmin/ v/2.X/ i/Radmin Authentication/ o/Windows/ cpe:/a:famatech:radmin:2/ cpe:/o:microsoft:windows/a
match radmin m|^\x01\x00\x00\x00\x25\x00\x00\x02\x12\x08\x02\x00\x00\x0a| p/Famatech Radmin/ v/3.X/ i/Radmin Authentication/ o/Windows/ cpe:/a:famatech:radmin:3/ cpe:/o:microsoft:windows/a
match radmin m|^\x01\x00\x00\x00\x25\x71\x00\x02\x12\x08\x02\x00\x71\x0a| p/Famatech Radmin/ v/3.X/ i/Windows Authentication/ o/Windows/ cpe:/a:famatech:radmin:3/ cpe:/o:microsoft:windows/a
match radmin m|^\x01\x00\x00\x00\x25\x08\x00\x02\x12\x08\x02\x00\x08\x0a| p/Famatech Radmin/ v/3.X/ i/Radmin Authentication/ o/Windows/ cpe:/a:famatech:radmin:3/ cpe:/o:microsoft:windows/a
match radmin m|^\x01\x00\x00\x00\x25\x79\x00\x02\x12\x08\x02\x00\x79\x0a| p/Famatech Radmin/ v/3.X/ i/Windows Authentication/ o/Windows/ cpe:/a:famatech:radmin:3/ cpe:/o:microsoft:windows/a
match radmin m|^\x01\x00\x00\x00\x25\x59\x00\x02\x12\x08\x02\x00\x59\x0a| p/Famatech Radmin/ v/3.3/ o/Windows/ cpe:/a:famatech:radmin:3.3/ cpe:/o:microsoft:windows/a
match radmin m|^\x01\x00\x00\x00\x25\x04\x00\x02\x12\x08\x02\x00\x04\x0a| p/Famatech Radmin/ v/3.0/ o/Windows/ cpe:/a:famatech:radmin:3.0/ cpe:/o:microsoft:windows/a
match radmin m|^\x01\x00\x00\x00\x09\x00\x00\x10\x4f\x2f\x10\x00\x00\x04\x00\x00\x00\x1c| p/Famatech Radmin/ v/3.X/ i/Source IP blocked/ o/Windows/ cpe:/a:famatech:radmin:3/ cpe:/o:microsoft:windows/a

softmatch radmin m|^\x01\x00\x00\x00\x25.\x00..\x08.\x00..|s p/Famatech Radmin/ o/Windows/ cpe:/a:famatech:radmin/ cpe:/o:microsoft:windows/a

match srcds m|^\n\0\0\0\0\0\0\0\0\0\0\0\0\0$| p/srcds game server/
To make it easier to find probes, the start of a new probe will always be preceded with a NEXT PROBE comment.
The Probe Directive
After the comment there are three lines that set up the probe.
Probe TCP Radmin q|\x01\x00\x00\x00\x01\x00\x00\x00\x08\x08|
ports 4899,9001
rarity 8
The first line is the Probe directive. This specifies the probe that NMAP should send to try to conduct version detection. The syntax of this line is as follows:
Probe <protocol> <probe_name> <probe_string>
The probe_string is wrapped in q|| pipes and supports escape sequences. This allows for the use of binary as shown in the example above by using hex encoded escape sequences; but whitespaces such as \r, \n, and \t are valid as well. This line specifies that NMAP should attempt to use that payload as a version detection probe on TCP services. The probe_name is just a friendly name for us to know what the probe is trying to look for.
The Ports Directive
The next line was the ports directive. This is an optional directive that is used to specify the ports that the service is likely to run on. This will allow NMAP to put priority on probes for that port. The syntax of the directive is as follows:
ports <portlist>
In the example we outlined, this is suggesting to NMAP that this service would likely be found on TCP ports 4899 and 9001. The portlist allows for a simplified syntax, but you can generally outline the ports in the same format as you would pass ports to the -p switch for a scan. Also of note is another similar directive of sslports. The sslports directive is similar to the ports directive, except that it will wrap the probe in SSL.
The Rarity Directive
The next line of this probe is the rarity directive. The rarity directive is used to specify how infrequently this probe is likely to return something useful. The syntax for this directive is as follows:
rarity <value between 1 and 9>
The value used is a number between 1 and 9. The higher the number, the more rare the service the probe is considered to find something useful and the less likely it is to be tried against a service.
The Match Directives
There were several lines of match directives under this probe. This is likely due to changes in the protocol of the service between different versions of the Radmin software. The syntax of the match directive is as follows:
match <service> <pattern> [<versioninfo>]
The <service> part is the service identifier that will show up if the match lands a hit. This is the value that shows up under the SERVICE column in the NMAP scan results. The next part of the syntax was the <pattern> part. The pattern supports Perl regular expression syntax, including the use of capture groups, which can be useful for capturing version numbers, hostnames, or operating system information. The syntax for the pattern should be in the format of m/[regex]/[opts].
Finally, there is the optional field of <versioninfo>. This field allows you to provide information for the VERSION column in NMAP and also attach information to the host for later phases to use (such as NSE) or update the CPE about the host. This section allows you to provide multiple arguments. For example, let's take a look at this match directive from the example earlier:
match radmin m|^\x01\x00\x00\x00\x25\x00\x00\x02\x12\x08\x02\x00\x00\x0a| p/Famatech Radmin/ v/3.X/ i/Radmin Authentication/ o/Windows/ cpe:/a:famatech:radmin:3/ cpe:/o:microsoft:windows/a
The <versioninfo> contains the following parameters:
p/Famatech Radmin/v/3.X/i/Radmin Authentication/o/Windows/cpe:/a:famatech:radmin:3/cpe:/o:microsoft:windows/a
The first one, p/Famatech Radmin/ is using the syntax of p/vendorproductname/. This sets the vendor and the service name. The second one, v/3.X/, uses the v/version/ syntax, which sets the version number of the product. The third, i/Radmin Authentication/, is using the i/info/ syntax, which adds information about the service that a user might immediately find useful. The fourth, o/Windows/, uses the o/operatingsystem/ syntax, which sets the operating system for the host. Since Radmin is only available for Windows, we can conclude that this system would likely be a Windows-based system. The fifth and sixth items are CPE formatting which do similar syntax to the first and fourth items.
For a full list of items that can be set in the <versioninfo> field, please check out the table in the NMAP book.
We also saw in the example earlier that it made use of the softmatch directive. What's the difference between the match and softmatch directives? The softmatch directive is basically the same as the match directive with two primary differences. The first difference is that the softmatch directive doesn't support the <versioninfo> field and the second difference is that the softmatch directive doesn't cause a hard stop to the version detection process. If a match is found via a softmatch, it will be captured for use, but version detection will continue to run to see if a hard match can be found. If a hard match is found, it will be used in place of the soft match for reporting. This allows for "softer" fuzzy matching to occur with harder matches being supported that might get a more accurate report. This is especially useful if the vendor tweaks small things in a binary protocol; you can set those as wildcards in a soft match so a new version still gets detected with a weaker version detection until a new hard match signature is added.
Example Target: Chrome Remote Debugging Port
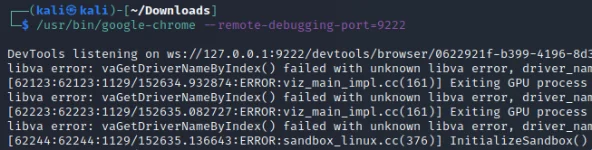
The Google Chrome browser has support for remote debugging. This feature is covered in a Chromium blog post and we can activate it by providing a command line switch of --remote-debugging-port=9222 to start the remote debugging service on TCP port 9222 using the following command:
/usr/bin/google-chrome --remote-debugging-port=9222
Once that command is run you will see a message in the terminal that the DevTools is listening on 127.0.0.1 on port 9222 as shown below.
Now that it is running we can use that Chrome browser and navigate to a web page, for example kali.org. Using another browser, we can connect to the debug port by navigating to http://localhost:9222/ and we will be able to see the tabs the browser has open as shown in the screenshot below.
-Apr-28-2023-01-42-44-2150-PM.webp)
Clicking on that tab will show us the page as it is visible to the client and also provide us with the DevTools console for the remote browser! A screenshot below shows what this looks like for the browser connected to the remote debugging service.
-1.webp)
In the wild, stumbling upon this is amazing as we can use the JavaScript console to force the browser to navigate somewhere else or figure out where the browser is connected to. So we would definitely be interested in this service being identified if it was running and exposed to a network!
Nmap Scan: Baseline
With that service still running we can run a basic NMAP TCP connection scan with version detection enabled. For our example we will limit it to just TCP port 9222 since that is the one we want to scan. The command we used was as follows:
nmap -sTV -vvvv -p 9222 localhost
At this point, NMAP will fail to detect this service properly. The results of the scan are shown below and are off by quite a bit. Its best guess is that this might be a teamcoherence service and it fails to identify it as an HTTP service.
-2.webp)
This scan, against a single port on localhost also took 1 minute and 22 seconds if we run NMAP with the time command in Linux.
-2.webp)
Having performed this scan while running Wireshark, we can see that scanning this single port resulted in a total of 245 packets being sent, across 31 sessions. This is due to not knowing what probe works best for the service on that port, it sent many other probes to try and detect the service.
-1.webp)
Why Did It Fail to Detect This as a Web Service?
The NMAP service file currently contains a GET request probe which uses an HTTP/1.0 version. However the Chrome remote debugging port doesn't respond to HTTP/1.0 requests. The screenshot below shows a capture in Wireshark where the service disconnected after receiving the request.
This was further visible in the console we started Chrome in with the remote debugging port. It began throwing error messages over the probes it couldn't support, with HTTP/1.0 being a part of it.
-1.webp)
However, if we send an HTTP/1.1 request, we can see the Chrome remote debugging port respond as shown in the screenshot below.
-1.webp)
This gets us a response but since it didn't send us a server, version, or anything like that, our best bet would be to use the title tags and the content between them as the canary for service detection.
Creating Our Probe and Signature
Since we know what this service is, we can attempt to edit the /usr/share/nmap/nmap-service-probes file ourselves. We know that all the guides out there suggest the port 9222, and developers will likely copy and paste that example. We also know that it will NOT respond to HTTP/1.0, but will respond to HTTP/1.1 requests. We also know that the title tag in the HTML response is likely the best canary we have for detecting this service.
As a result of this knowledge, we can add the following probe to the end of the /usr/share/nmap/nmap-service-probes file:
##############################NEXT PROBE##############################
Probe TCP ChromeDebug q|GET / HTTP/1.1\r\n\r\n|
rarity 9
ports 9222

match chrome-debug m|<title>Inspectable pages<\/title>| p/Chrome Remote Debugging/
We needed to create a new probe as it appears NMAP's nmap-service-probes file doesn't currently have a GET / HTTP/1.1 probe. If it did, all we would need to do is add the match directive under that probe and append the 9222 port to the ports directive for that probe. However since that didn't exist we created our own probe and gave it a high rarity since encountering this service is likely really low in the real world. We also use the ports directive to limit our probe to the known "default" port that most people would likely copy and paste from the example.
Nmap Scan: After Probe Creation
Once we add the probe to the end of the /usr/share/nmap/nmap-service-probes file, we can re-run our scan using the same command as last time. Now we can see that NMAP is able to identify our service correctly for us!
-1.webp)
Not only were the results correct this time, but the scan now runs a lot faster than the first time; only taking 6.25 seconds as opposed to 1 minute and 22 seconds.
-1.webp)
This is because NMAP was no longer having to brute force probes against this service. Since the nmap-service-probes file now has a probe registered to this port, it attempts that one first and since it hit a match, it was able to stop there and report it. We can also see in Wireshark that this scan now only generates 14 packets of traffic across two TCP sessions.
-1.webp)
Below shows the entire capture packet list. The first session was simply the connect scan connecting to the service to find that it is active. The second session was the HTTP/1.1 probe being sent and getting the 200 OK response back. Since that matched our signature, NMAP didn't need to perform any other probes against the service.
-1.webp)
This means that taking the time to produce service probes for NMAP will not only improve the quality of the scan results, but can very well make them faster, more efficient, and consume less bandwidth! This is definitely something worth exploring if you conduct lots of scans and NMAP isn't detecting some new service that you could identify yourself.
Want a team that builds custom tools and signatures for your assessments?
Our consultants go beyond off-the-shelf scanning to identify services and vulnerabilities that automated tools miss. Reach out to discuss a penetration test.
Talk to Our Team