
(artwork created by stable diffusion)
Quick Series Intro
In this "Uncharted Waters" series, I'm exploring topics from a beginner/intermediate point of view with different topics (i.e. homelabs, automation, security, etc.). While these topics can be dense or advanced, I'll give enough information to help guide you through lesser documented topics while still showcasing modern tools. This will be a blend of my own personal experience and also from my experience working here at Secure Ideas. I plan on giving a backstory on why I'm doing each blog post, but I'll outline the content so you can skip the backstory if you want.
For topics I don't cover in-depth I'll link to other relevant resources for more information. If you have suggestions for additional resources, please DM me on Twitter or Mastodon with a resource you'd like to see or have used. If you'd like to have me create a post about a particular topic, please feel free to DM me about that as well.
Background
If you just want the commands, skip to the Content section.
Personally I really enjoy creating my home lab network, and it's evolved over time as I've progressed with my career. Initially it began as a Time Warner Cable two-in-one, which was both an access point and a gateway. From there I installed OpenWRT on a second-hand access point. While it was cool, it still wasn't as user friendly and intuitive as I'd like. So I migrated to using pfSense, a platform that was really good at the time. I ended up diving more into WireGuard, but pfSense didn't support it yet. Fortunately OPNsense did, and so that was my last step from a firewall perspective. It's been awesome, and I haven't looked back.
With pfSense I initially had a very basic setup, and gradually grew that to have multiple VLANs. From a security perspective, it's a good idea to logically group types of devices on their own VLAN but when it comes to doing asset discovery for devices on your network it makes things harder. You either have to 1) have a trusted VLAN, which has access to all other VLANs, or 2) do the asset discovery on the device that is handling all the VLANs. For this blog post we're going to be doing the latter.
runZero is a product we've used at Secure Ideas that has both a commercial version and a free version, and the latter is what I used in my homelab. It's nice to get a high level view of what assets are on your network, as well as some really rich fingerprinting for services and hosts. My plan is to eventually figure out a way to integrate the enumerated hosts into vulnerability scanning to help expedite that process.
Since I wanted to use runZero on my OPNsense box and I couldn't find any content on how to do that, I decided to make the content myself.
Content
Only Commands
For those who just want the commands to get everything setup and a short summary of what the command does, I've listed them below. For a more detailed walk through please see the Explanation section.
Install the binary (get link from here):
curl -f -o /usr/local/sbin/runzero \
  https://console.rumble.run/download/explorer/<redacted>/<redacted>/runzero-explorer-freebsd-amd64.bin
  && chmod +x /usr/local/sbin/runzero
Add a service for it:
cat >/usr/local/etc/rc.d/runzero<<'EOF'
#!/bin/sh
# PROVIDE: runzero
## Uppercase based off of running:
## rcorder /usr/local/etc/rc.d/*
# REQUIRE: NETWORKING
# KEYWORD: shutdown

. /etc/rc.subr

name=runzero
desc="Runzero runs for asset discovery"
rcvar="${name}_enable"
load_rc_config $name
pidfile="/var/run/${name}.pid"
procname=/usr/local/sbin/runzero
command=/usr/sbin/daemon
command_args="-S -p ${pidfile} ${procname}"
run_rc_command "$1"
'EOF'
Start and enable the service:
chmod +x /usr/local/etc/rc.d/runzero
service runzero enable
service runzero start
# check if it's running
service runzero status
Explanation
Some general assumptions I'll be making for this post are:
- You are aware of and have installed VirtualBox
- Installed Vagrant
- Can download a GitHub repo
- Able to use a command line interface (CLI) and use basic commands (i.e. cd)
- Created a runZero account: https://console.runzero.com
How is This Possible?
Since OPNsense is the central location that all VLANs for a network meet at, or at least it is in my homelab, runZero is able to see all devices on the entire network. runZero's explorer agent is able to be installed on OPNsense because it's effectively a FreeBSD machine with a lot of customizations on top. So, I found this blog post on how to create a service in FreeBSD and I was able to modify it to suit my use case of launching runZero's explorer agent.
Walkthrough
Setup
Instead of you needing to have an OPNsense installation, in case you don't have that use case or need, I've forked someone else's GitHub project so we can use a Vagrantfile to "install" OPNsense locally. The repo is here: https://github.com/elreydetoda/vagrant-opnsense
Once you've downloaded that repo and navigated with your CLI to its folder, you'll be able to do a vagrant up. That will automatically pull down and customize a FreeBSD 13 VM converting it to an OPNsense VM, but after it finishes you'll have to do a vagrant up again to start the machine after its configuration. You can now do a vagrant ssh to connect into the OPNsense machine, and do sudo -i to promote to root. Once you're the root user you'll be prompted to choose an option by the OPNsense CLI interface, and you'll hit the number 8 and then hit enter. Now you should be in a normal shell as the root user. After that, you can follow the only commands to install the binary, create a rc.d service, and start it so it'll communicate with the runZero hosted web-ui.
Here's a recording of the setup steps, but one part has some sensitive information (subscription ID) redacted:
runZero Deployment
After you've deployed the explorer agent you can go to the runZero console, and you can follow their getting started guide but start at step number 2 since we've already deployed an explorer: https://console.runzero.com/get-started.
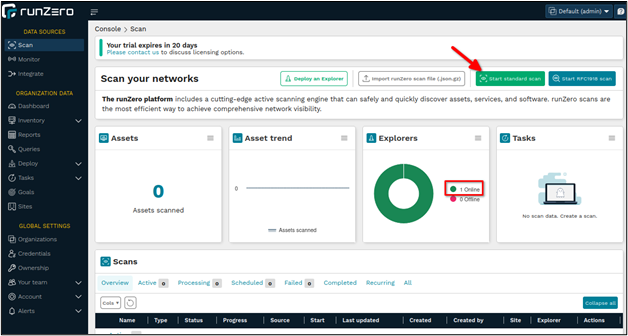
On the scan page you should see your explorer online, as shown in the screenshot below, and you can then click on the Start standard scan button.
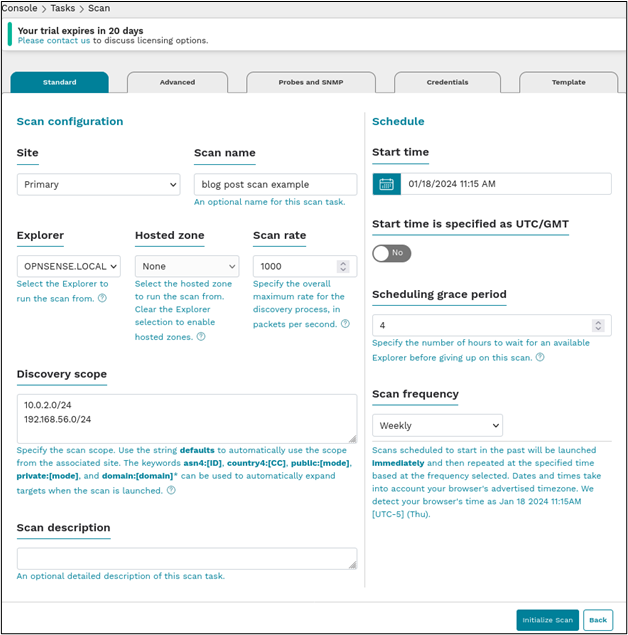
As shown below, it should automatically pick up on what subnets should be scanned and all you should need to do is set a scan frequency and set the name + description.
Once you confirm the scope, it should start scanning and take you to a screen that looks like the screenshot below.
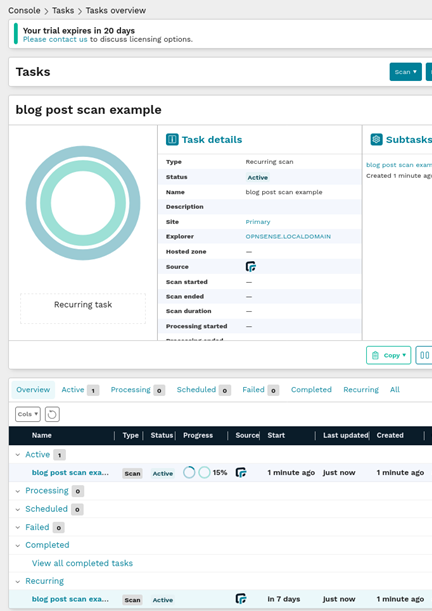
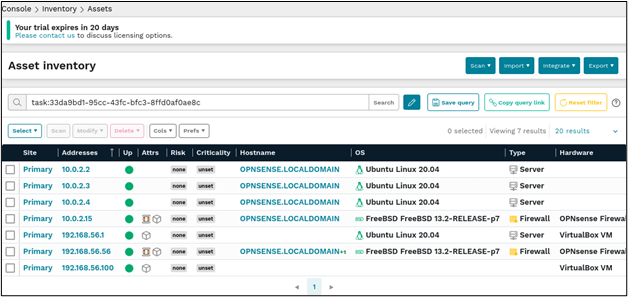
After your scan has finished processing you will be able to view assets in the inventory now, similar to the screenshot below.
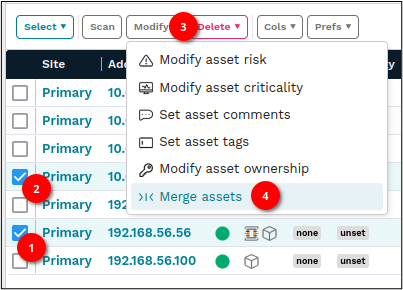
One really awesome thing you can do is combine assets (i.e. 10.0.2.15 and 192.168.56.56), so if for some reason runZero didn't automatically merge the asset by itself you can manually do it.
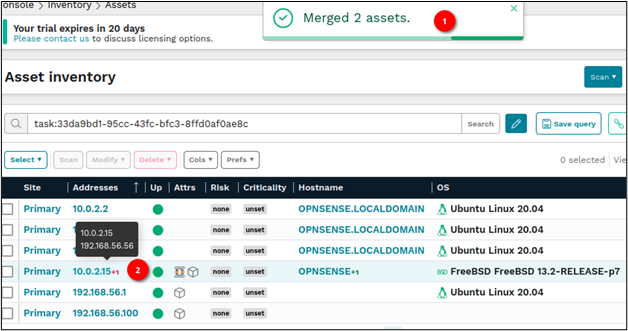
Afterwards your screen should look like the screenshot below, and you can see that the IPs are now combined.
A more detailed review of how to use the runZero product can be found in this video:
Need help with asset discovery and network security?
Our team can help you identify what's on your network and where the vulnerabilities are. Reach out to discuss a network penetration test or vulnerability assessment.
Talk to Our Team