Introduction
Fuzzing is a critical technique for finding vulnerabilities in web applications by efficiently trying a large volume of different inputs. Typically, we capture the legitimate request in our interception proxy (Burp, ZAP, etc.) and use its fuzzing tools to repeat that web traffic with our list of payloads. But what if you can't use a proxy because of the application's security measures? That's the situation I found myself in during a penetration test a few years ago. This particular application required a security agent (similar to anti-cheat software) to be installed on my test machine, and this agent prevented me from using many standard tools, including proxying my traffic.
Faced with these limitations, I had to rely on my software development skills and the built-in tools of the browser itself. This experience led me to develop some scripting to perform fuzzing directly from the browser's console, circumventing the need for the proxy. In this blog post, I will expand on the situation that led me down this path, and walk you through using my script to fuzz standard HTTP interfaces when you can't capture your traffic with a proxy. It's a narrative that underscores the importance of adaptability in penetration testing and offers a preview of the techniques I'll be covering in my upcoming webinar on fuzzing less common web interfaces, such as SOAP services and Protocol Buffers.
The Challenge
Imagine a scenario where you're faced with an application that only works when your test machine is operating under strict constraints that bar traditional interception tools. No setting a proxy, no leveraging virtual machines, nothing. This was the challenge I encountered a few years ago during a penetration test. The application in question required an installed agent that effectively handcuffed typical penetration testing approaches. This agent, managed by a third-party not engaged in the test, meant that I would not be able to route my traffic through an interception proxy. When we tried some methods to bypass this restriction, it led to the third-party blocking our use of the app completely. Our client was able to request that we be unblocked, but that request took nearly a full day to process. To make matters worse, there was no way of putting us on an allow list that would keep us from being blocked again if we continued trying to bypass the control. This was not something the client had identified in advance of the test, so the clock was ticking, and we needed to find a way to get high-quality test coverage without any of our usual tools.
Developing the Solution
Faced with this challenge, I had to get creative within the capabilities of the browser itself. As a software developer, I have worked on web applications for just shy of 20 years. I have worked with a variety of languages and backend technologies but JavaScript was ever present and something I am pretty comfortable with. Leveraging that background, combined with my experience in penetration testing, I leveraged the browser's developer tools and JavaScript console as my testing platform. Their Network tab provided many of the things I needed, out of the box. It showed my immediate history, provided replay functionality, and had the ability to export the request and response traffic as a HAR file for persistence and follow-up analysis. It also held the key to fuzzing the app in its ability to generate a JavaScript fetch command for any request. I was able to quickly write some reusable code for iterating over a hardcoded wordlist and reissuing the fetch, with my wordlist value substituted into a targeted part of the request payload. This was enough to get through that engagement with confidence that we had been thorough in testing that application.
There are some penetration tests that have some really odd constraints or characteristics that I expect I may never come across again. Other times, I run across some obstacle and fully expect to see it again, maybe not frequently, but it is likely to recur. Testing without a proxy felt like the latter, and the script I had written for that one was not flexible enough to be repurposed for other tests. So a few weeks later, I took what I had learned and used it to write the evil-browser-toolkit, a drop-in script that provides simple fuzzing capabilities in the browser. While I have not made an effort to draw attention to the project, I made the script open-source immediately. I also virtually presented it at an OWASP Jacksonville meeting in June 2021.
Let's take a look at how it works.
Step-by-Step Demonstration
0. Before Loading
I'm going to assume you have the target page already open in a browser. You will be using the Network tab in the browser's developer tools as well, so make sure you open that up. (How to in Firefox and Chrome)
1. Setup
The repository is at https://github.com/mgillam/evil-browser-toolkit. While you could clone the repo, you're really only interested in copying and pasting the content of the main.js file. Here's a direct link to the raw version: main.js (raw)
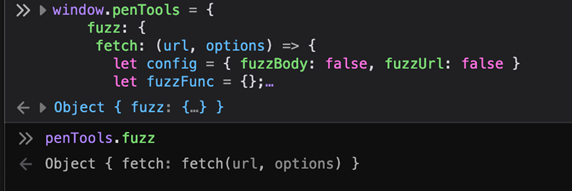
The next step should not generally be considered safe to do from untrusted sources, so even though I wrote this script and know there's nothing malicious in it, I feel obligated to recommend you review the JavaScript to make sure it does not contain anything malicious. Once that's done, copy the entire content of that file, paste it into your DevTools JavaScript console to run it. This defines a penTools object in the global scope, which has a .fuzz property.
2. Create the Fuzzer
For the next step, you want to have the target request in the Network tab of the developer tools. I'm using Firefox Developer Edition in these examples, but the same process works in Chrome, and may in many other browsers.

Once you have identified the request, right-click it and choose the Copy Value > Copy as Fetch option from the context menu, then paste it into the Console, but do not submit it (we want to edit it first). Prefix the word fetch with let fuzzer = penTools.fuzz. removing the word await if your browser included it in the pasted content.
Before:

After:
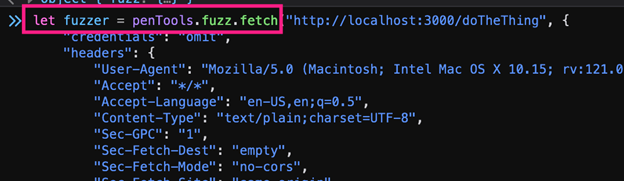
What this has done is called my fetch function on the fuzz object instead of the browser's built-in fetch. While the built-in fetch would issue a request, my fetch function serves an entirely different purpose. It takes the same parameters but constructs a fuzzer for that request, which we can then configure further before running the fuzzing.
3. Configure the Fuzzing Job
The fuzzer uses a fluent API to make it easy to chain the configuration together and run it in a one-liner. The image below shows this.
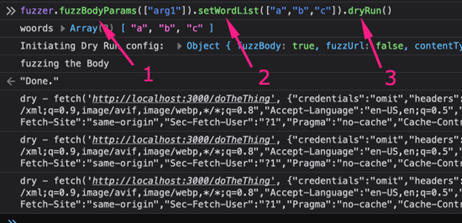
- Specify the array of parameters to fuzz with fuzzBodyParams, in this example a single element that is the parameter named arg1. In my example, it was a url-encoded form POST with a payload of arg1=test&arg2=bar, meaning this configuration will only replace the value test with my payloads, and not the word bar.
- Set the word list with setWordList. I have an array of values a, b, and c. The parameter for this one does not have to be an array, it can also be a string. If it's a string, it will be treated as a newline-delimited list of payloads.
- dryRun logs an entry to the console for each fetch that would be issued, but does not actually send the requests.
4. Run the Fuzzing Job
Simply change the end of the previous example from dryRun() to run(). This will issue the requests (three of them in my example) with the word list substituted into the target parameter. These can be reviewed in the Network tab.

A couple more options:
- The requests can have a waiting period between them if options are supplied to the run or dryRun command with a throttle property, expressed in milliseconds. The example below would add a 2-second delay between them, and even on the dryRun the logging messages reflect that delay.

There is also a function called loadWordList that can be used instead of setWordList, which loads the payloads from a text file (line-delimited), using the browser's file selection dialog. However, that particular function only works in Chromium browsers due to a difference in Firefox's requirement for user interaction to trigger certain browser events.
Limitations and Considerations
While using the scripting interface in the browser is a novel approach to fuzzing, I want to be clear that I am not claiming it is equal to, or better than, the more conventional tools. My implementation is less featureful than the included tooling in either of the popular interception proxies, and falls significantly short of options like Turbo Intruder. Its unique characteristic is that it is viable in the specific edge case where proxying is not available. Some key things missing from it are:
- Lack of throttling or incremental backoff, beyond the simple delay
- No support for attacks that use multiple payload sets (e.g. Burp Intruder's pitchfork, cluster bomb, battering ram attack types)
- The browser prevents certain types of manipulation (e.g. cannot change or remove certain headers, prevented from malforming requests in certain ways)
- Won't work with request formats other than JSON or URL-encoded
Conclusion
Developing the evil-browser-toolkit was a direct response to a specific challenge: testing a web application under strict security measures that prevented proxying. This tool illustrates one of my favorite traits found in penetration testers and security professionals: we use what we know to build what we need. The toolkit is just another entry in our toolset, based on a need that we encountered in the course of penetration testing. While I have not had to reach for it often, it has been leveraged on a few other engagements since I wrote it.
Missed our live webcast? You can watch the full recording of Hot Fuzz: Tips for Testing Web Services of All Kinds.
Need a thorough web application penetration test?
Whether your application has standard or unusual security constraints, our team has the expertise to test it thoroughly. Reach out to discuss a security assessment.
Talk to Our Team