

Overview
In the last blog post in this series, we created a tool to make it easy to build our custom payloads and extract them. However, what if we want to test them before trying to use them? It seems like a good idea to make sure it works before you include it in an exploit. Testing it first would at least let you know that it works and reduce troubleshooting surface if the exploit fails. Today we are going to focus on building a payload tester stub in the C programming language. This will make it easy for us to copy and paste our C-style formatted payload from our build-and-extract tool. Once it's pasted in the tester stub, just compile and run it and you will be able to see your payload in action. The code for payload tester stub and Makefile can be found in the /utils/ folder of the Secure Ideas Professionally Evil x86_asm GitHub repository.
A Quick Primer on C: Char Arrays
Our last blog demonstrated that the build-and-extract payload script could output our hello world payload as a C-code format by using the --style=c switch. The resulting output would look like the following:
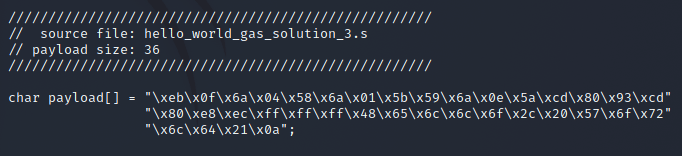
Let's break down the output. If you are familiar with the C programming language, you can probably skip ahead. The first 4 lines are simply comments that show the payload's source file and size.

The rest of the output is actually a single line of code, formatted across a few lines to look cleaner. This line declares and initializes a char array called payload. A char (short for character) is a data type for a single byte. A char array is an array of bytes. The output from our build-and-extract script also initializes it using a string with "\x##" hex notation of our payload. This line can be copied into a C program and it would effectively be a buffer with our payload data.

A Quick Primer on C: Pointers and Typing as a Function
Another topic we will want to touch upon before heading into C code is pointers and more specifically, function pointers. In C, functions are normally invoked by adding () or (parameter1=val, etc) after the function's name. For example int res = strlen(someString); would be a valid line.
A pointer is simply an address to a memory location. This can be a pointer to any sort of data type, declared with a data type and an asterisk followed by the name. For example, a pointer to a char buffer could be declared as char *myBuffer. Pointers are easy to pass around from function to function in C and allow your application direct memory read and write to the same area of memory across different functions.
Where pointers get even more interesting is they can be nearly anything, including a pointer to a function! By setting the pointer's declaration as a function pointer, you can use the pointer like a function. This can allow you to have dynamic functions at runtime, which can be useful for plugins or applications that allow complex configurations, and even LD_PRELOAD hijacking.
In this example, we will use a function pointer to point to our payload buffer, so we can use the function pointer to invoke our payload. Here are some examples of how to declare various function pointers:
| Function Declaration | Pointer Declaration |
|---|---|
size_t strlen(const char *s); |
size_t (*ptr)(const char *); |
int my_func(int argc, char **argv) |
int (*ptr)(int, char **); |
void my_func() |
void (*ptr)(); |
In our case, we just want to run our payload and are not expecting a return value, nor are we passing parameters to it. So that last entry in the table is a prime example of what we want. Below shows how we would point this to our payload:
// Create a function pointer to the shellcode and
// display it to the user.
void (*payload_ptr)() =  (void(*)())&payload;
Linux Memory Mapping: Memory Page Permissions in the Age of DEP/NX
Memory is usually mapped in what are known as pages. A page is just a chunk of memory that should be a fixed size, which is decided by the system. On a Linux system, it is possible to determine the page size using getpagesize(). Pages also allow a region of memory to have read, write, and execute permissions set on it. If the EIP register tries to point somewhere in a memory region that is NOT marked as executable, the program should segfault.
In the age of DEP/NX in Linux, at launch time a section can either be executable or writable, but not both. However, there are times where code would need to modify itself at runtime, such as compressed or self-modifying code. You can modify the permissions by calling mprotect(). The mprotect() call allows you to set the RWX permissions on a memory page. It is important to note that the pointer for this call must point to the start of a memory page, and the size should be the size of a memory page.
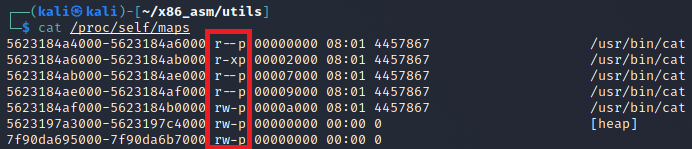
If you ever need to see the memory pages of a process, you can check under /proc/<PID>/maps to see the maps and their permissions.
Overview of Our Stub
First let's review our code in its complete form, then we shall break it down. The code for payload tester stub and Makefile can be found in the /utils/ folder of the Secure Ideas Professionally Evil x86_asm GitHub repository. Here is the complete stub code:
#include <stdio.h>
#include <unistd.h>
#include <sys/mman.h>

/////////////////////////////////////////////////////
//  source file: hello_world_gas_solution_3.s
// payload size: 36
/////////////////////////////////////////////////////
char payload[] = "\xeb\x0f\x6a\x04\x58\x6a\x01\x5b\x59\x6a\x0e\x5a\xcd\x80\x93\xcd"
                 "\x80\xe8\xec\xff\xff\xff\x48\x65\x6c\x6c\x6f\x2c\x20\x57\x6f\x72"
                 "\x6c\x64\x21\x0a";

int main() {
    // Print the banner.
    puts("\n\t---===[ Shellcode Tester Stub v1.0 ]===---\n");

    // Print the size of the shellcode.
    printf(" [*] Shellcode Size:  %d\n", sizeof(payload)-1);

    // Create a function pointer to the shellcode.
    void (*payload_ptr)() =  (void(*)())&payload;
    printf(" [*] Shellcode Address: 0x%08x\n", payload_ptr);

    // Calculate the address to the start of the page.
    void *page_offset = (void *)((int)payload_ptr & ~(getpagesize()-1));
    printf(" [*] Shellcode page: 0x%08x\n", page_offset);

    // Use mprotect to mark that page as RWX.
    mprotect(page_offset, getpagesize(), PROT_READ|PROT_WRITE|PROT_EXEC);

    // Finally, use our function pointer to jump into our payload.
    puts("\n---------[ Begin Shellcode Execution ]---------");
    payload_ptr();

    // We likely won't get here, but just in case.
    puts("---------[  End Shellcode Execution  ]---------");
    return 0;
}
The first part is standard header includes followed by our global payload buffer. This code was copied and pasted exactly as the build-and-extract payload script output. This payload stub tester code can be re-used for most payload tests by simply replacing this section with another payload.
In main(), after printing the banner and payload size, we create a function pointer called payload_ptr that points to our global payload buffer. We also output the address where the payload is stored in memory since this might help with debugging.
Next we calculate the start of the memory page that contains our payload. The way to calculate this is to get the address to our payload, get the page size and use bitwise NOT to invert it, then use a bitwise AND operation on the payload address and inverted page size. We then use mprotect() to set the memory page's permissions to be read, write, and executable (RWX). Finally, we use our function pointer to invoke the payload.
Compiling the Stub and Testing Our Payload
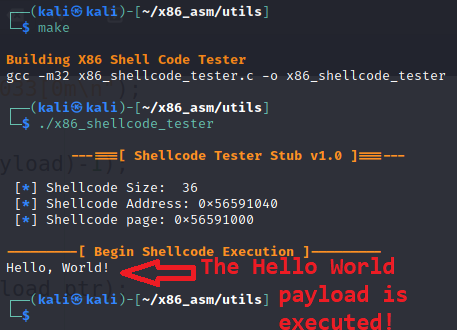
Building the payload tester stub is simple. You can compile by hand using gcc or use the provided Makefile:
gcc -m32 x86_shellcode_tester.c -o x86_shellcode_tester
After it is built, we should be able to run our tester and watch our payload execute as shown below.
Conclusion
I hope you've enjoyed this blog post and learned something new today about testing your shellcode and using C function pointers. The code for this post can be found in the Secure Ideas Professionally Evil x86_asm GitHub repository.
If you're interested in security fundamentals, we have a Professionally Evil Fundamentals (PEF) channel that covers a variety of technology topics. We also answer general basic questions in our Knowledge Center.
Linux X86 Assembly Series Blog Post
Interested in more information about the X86 architecture and Linux shellcode/assembly? This blog is a part of a series and the full list of blogs in this series can be found below:
- A Hacker's Tour of the X86 CPU Architecture
- Linux X86 Assembly - How to Build a Hello World Program in NASM
- Linux X86 Assembly - How to Build a Hello World Program in GAS
- Linux X86 Assembly - How to Make Our Hello World Usable as an Exploit Payload
- Linux X86 Assembly - How To Make Payload Extraction Easier
- Linux X86 Assembly - How To Test Custom Shellcode Using a C Payload Tester
Custom payloads. Manual exploitation. Real results.
Our testers build custom tooling and write their own shellcode when the job calls for it. If you want a penetration test that goes deeper than an automated scan, reach out.
Reach Out