This post picks up on my last about creating and authorizing an internal certificate authority. We are going to shift gears a bit and start looking at how to use this newfound infrastructure. There are tons of tutorials online about how to create a certificate signing request (CSR) using IIS on Windows. However, there are plenty of instances in which a server will require an SSL certificate, but does not have IIS installed on it. So let's dive in and take a look at setting up LDAPS on a domain controller.
The idea of pointing a system or web application to an LDAP instance for authentication has been around for quite a while. We see it all the time when doing client engagements, but it’s not uncommon to see that this authentication is being done without encryption. So while we gain a bit by centralizing authentication, we lose a lot more by sending our credentials across the network in clear text. And keep in mind that these are the same credentials which we log into our computers with and give us our access to all our network resources. To get around this, we just need to enable LDAPS (LDAP over SSL) on our domain controllers.
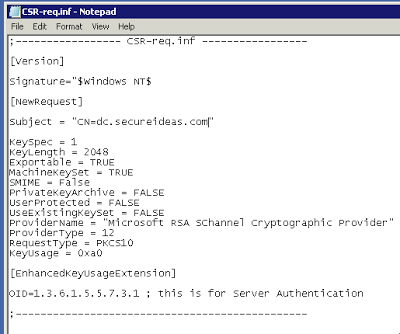
First we will need to setup a configuration file for our signing request. Hopefully, we don’t have IIS running on domain controllers. So to create our CSR we will use certreq.exe. We start off by creating a text file which contains all the settings we need to have in our CSR.

The critical field of this configuration file is Subject and is where we put the fully qualified domain name (FQDN) of our server. If our domain controller’s FQDN is dc.secureideas.com, then we need to have this set as the CN. The other field that may be of note to us is the KeyLength. For this example, we will use 2048 bits, but we could easily go larger to 4096 bits as well.
With this done, it's now time to create our CSR. To do this, open cmd.exe and navigate to the directory which our configuration file is. We will create the CSR by running “certreq.exe -new CSR-req.inf dc.secureideas.com.csr”. The -new argument tells certreq that we are creating a CSR, then we specify the configuration file for the certificate and finally the file that will contain the actual CSR.

Now we can copy the CSR to our internal CA that we built last week and create the new certificate. Copy the CSR up to the directory which contains the CA key and certificate on our CA server. When we built our CA, this was set to /etc/ssl. To sign the request we run as root “openssl x509 -req -days 3650 -in dc.secureideas.com.csr -CA ca.crt -CAkey ca.key -CAcreateserial -out dc.secureideas.com.cer”. The arguments in this command indicate that we are signing an x509 certificate, -req indicates that we will be signing a request, -days 3650 indicates that the certificate will be valid for 10 years, -in dc.secureideas.com.csr refers to the CSR, -CA ca.crt is the CA certificate, –CAkey ca.key indicates the private key of the CA, -CASerial creates a file named ca.srl and is required for the -CA argument. Last we use -out dc.secureideas.com.cer to tell openssl where to write the signed certificate. The resulting certificate is then copied back to our domain controller so that we can import it for use.
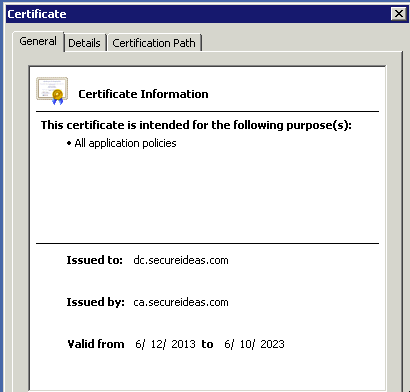
If we double click on the certificate on our Windows server, we can see that the certificate is completely valid and recognized by our server. This is due to our CA certificate being imported as a valid signing authority previously.
We can now import the certificate into our domain controller to enable LDAPS. To do so, go back to our command prompt and run “certreq.exe -accept dc.secureideas.com.cer”. The certificate will be installed on the server and is almost ready for use. Reboot the domain controller and Active Directory will pick up the certificate and use it for LDAPS connections.
To test whether LDAPS is working properly, run ldp.exe after the server reboots. Open Connection->Connect in ldp.exe and enter the FQDN domain name of the domain controller, change the port to 636 and select the checkbox for SSL. Press OK and if all has gone well, the connection will be created and the RootDSE will display in the right pane.
Unencrypted LDAP is one of the things we look for on a pentest.
Cleartext credentials on the wire, misconfigured domain controllers, and weak certificate infrastructure are common findings during an internal penetration test. If you want to know what an attacker would find in your Active Directory environment, we can help.
Get in Touch