

In Part 1 of this series, I walked through an introduction to Postman, a popular tool for API developers that makes it easier to test API calls. We created a collection and added a request to it. We also talked about how Postman handles cookies, which is essentially the same way a browser does. In this part, we'll tailor it a bit more toward penetration testing by proxying Postman through Burp. In the upcoming Part 3 and Part 4, we'll deal with more advanced usage of Postman and using Burp extensions to augment it, respectively.
Why Proxy?
By using Postman, we have its benefits as a superior tool for crafting requests from scratch and managing them. By proxying it through Burp, we gain its benefits as well: we can fuzz with Intruder, we have the passive scanner highlighting issues for us, we can leverage Burp extensions as we will see in Part 4 of this series, and we can use Repeater for request tampering. Yes, we could do our tampering in Postman. There are two strong reasons to use Repeater for it: 1) Postman is designed to issue correct, valid requests and under some circumstances will try to correct malformed syntax. When testing for security issues, we may not want that. 2) By using Repeater, we maintain a healthy separation between our clean-state request in Postman and our tampered requests in Repeater.
Setting Up Burp Suite
An actual introduction to Burp is outside the scope of this post. If you're reading this, you're likely already familiar with it. We aren't doing anything exotic or different for API testing. If you're unfamiliar, here are some resources:
- The official website - There's a community edition available for download; the pro version is quite affordable as well - https://portswigger.net/
- Tactical Burp Suite - Our 2-hour recorded class, now free - https://youtu.be/DFnxptySDgI
- Burp Suite: Continuing the Saga - Larry's post on Burp Suite - /2018/03/burp-suite-continuing-the-saga.html
![]()
Launch Burp and check the Proxy > Options tab. The top section is Proxy Listeners, and you should see a listener on 127.0.0.1, port 8080. It must be Running (note the checkbox). If it's not running by default, that typically means the port is not available, and you will want to change the listener (and Postman) to a different port. As long as Burp is listening on the same port Postman is trying to proxy through, your setup should work.

Also check the Proxy > Intercept tab and verify that Intercept is off.
Configuring Postman to Proxy Through Burp
Postman is proxy-aware, which means we want to point it at our man-in-the-middle proxy, Burp Suite. Open the Settings dialog by clicking the Wrench icon in the top-right and then the Settings option on its dropdown menu. This will open a large Settings dialog with tabs across the top for the different categories of settings. Locate the Proxy tab and click it to navigate.
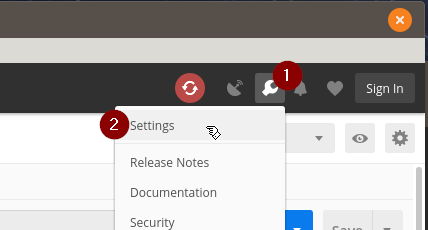
Opening the Postman Settings pane
There are three things to do on this tab:
- Turn On the Global Proxy Configuration switch.
- Turn Off the Use System Proxy switch.
- Set the Proxy Server IP address and port to match your Burp Suite proxy interface.
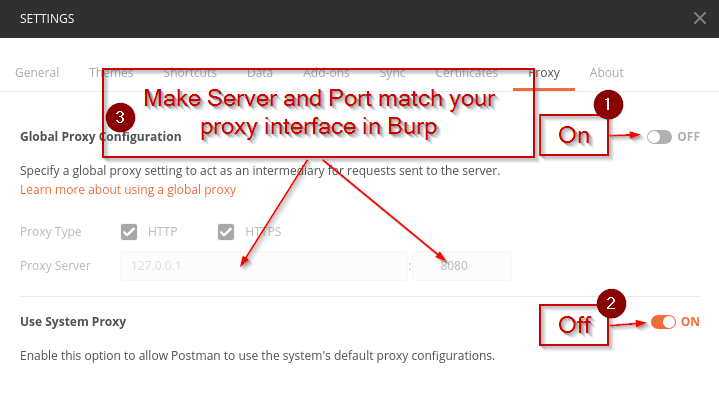
Proxy Settings Tab - Pointing Postman at your Burp Suite listener
The default proxy interface will be 127.0.0.1, port 8080, assuming you are running Burp Suite on the same machine as Postman. If you want to use a different port, specify it here and make sure it matches the proxy interface in Burp.
Now that you are able to proxy traffic, there's one more hurdle to consider. Today, SSL/TLS is used on most public APIs. This is a good thing, but it means when Burp man-in-the-middles Postman's API requests and responses, you will get certificate errors unless your Burp Certificate Authority is trusted by your system. There are two options to fix this:
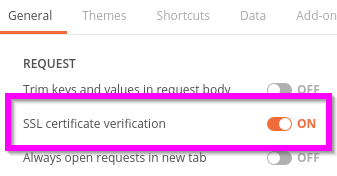
- Turn off certificate validation in Postman. Under the General settings tab, there's an SSL certificate verification option. Setting it to Off will make Postman ignore any certificate issues, including the untrusted Burp Suite PortSwigger CA.
- Trust your Burp Suite CA to your system trust store. The specifics are platform-specific. PortSwigger's documentation for it is here: Installing CA Certificate
Verify That It Is Working
Issue some requests in Postman. Check your HTTP History on the Proxy tab in Burp.
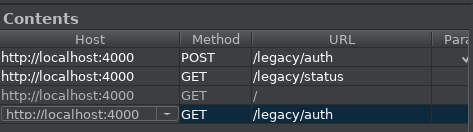
Proxy history in Burp Suite
Troubleshooting
- Your request is stalling and timing out? Verify that Intercept is Off on the Proxy tab in Burp. Check that your proxy settings in Postman match the Proxy Interface in Burp.
- Postman is getting responses but they aren't showing in the Proxy History in Burp? Check the Settings in Postman to verify that Global Proxy Config is turned on. Make sure you haven't activated a filter on the History in Burp that would filter out your requests. Also make sure your scope is set if you're not capturing out-of-scope traffic.
Next Steps
So this was two posts of pretty elementary setup. Now that we have our basic toolchain set up, we're ready for more advanced topics. Part 3 will deal with variables in Postman and how they can simplify your life. It will also dig into the scripting interface and how to use it to simplify interactions with more common, modern approaches to auth, such as bearer tokens.
Need your APIs tested by someone who already has the toolchain dialed in?
Our team tests APIs every day using the same tools and workflows described in this series. If you have an API that needs a thorough security assessment, reach out.
Talk to Our Team